
'%3e%3cpath%20fill-rule='evenodd'%20clip-rule='evenodd'%20d='M19%208.5C24.799%208.5%2029.5%2013.201%2029.5%2019C29.5%2024.6782%2024.9928%2029.3036%2019.361%2029.4939L19%2029.5C18.8794%2029.5%2018.7592%2029.498%2018.6396%2029.4939L18.2811%2029.4758C12.8174%2029.1063%208.5%2024.5574%208.5%2019C8.5%2013.201%2013.201%208.5%2019%208.5ZM22.3063%2010.6267L22.2342%2010.6539C21.3423%2011.0061%2020.5541%2011.6368%2020.5606%2012.4987C20.5631%2012.8302%2020.869%2014.8871%2020.2141%2014.8486C19.5589%2014.8102%2019.413%2013.8753%2018.7116%2013.616C17.5944%2013.2026%2016.9819%2014.3401%2017.0939%2015.3106C17.1695%2015.9655%2018.9289%2018.3871%2017.9028%2019C17.292%2019.3651%2015.7279%2017.5692%2015.1007%2017.1842C14.4805%2016.8034%2013.2758%2017.3333%2012.4974%2016.7029C11.9874%2016.2899%2012.3881%2014.4098%2012.2786%2013.8372C12.2271%2013.5698%2012.1155%2013.3689%2011.9794%2013.2166L12.0402%2013.2934C10.7653%2014.8464%2010%2016.8339%2010%2019C10%2023.8465%2013.8307%2027.7982%2018.6295%2027.9925L18.6769%2027.9747C18.8597%2027.8677%2019.0394%2027.7557%2019.216%2027.6387C19.4137%2027.4534%2019.5436%2027.2072%2019.5849%2026.9394C19.8806%2025.1222%2018.3616%2025.4302%2017.9367%2024.5622C17.5489%2023.7695%2018.5712%2023.7684%2018.5524%2021.7923C18.4607%2021.1774%2018.5279%2020.547%2018.7211%2020.0315C19.1834%2018.7987%2020.7077%2017.2643%2022.5889%2018.0081C23.5567%2018.3906%2023.1524%2019.9831%2023.4737%2020.3394C24.251%2021.2018%2025.3228%2020.6863%2026.2856%2021.2253C26.7816%2021.5032%2026.9797%2022.41%2027.056%2023.2248L27.038%2023.0528C27.6534%2021.8348%2028%2020.4579%2028%2019C28%2015.1968%2025.6409%2011.9445%2022.3063%2010.6267Z'%20fill='%23757575'/%3e%3ccircle%20cx='19'%20cy='19'%20r='10.125'%20stroke='%23757575'%20stroke-width='2.25'/%3e%3c/g%3e%3cdefs%3e%3cclipPath%20id='clip0_1827_14613'%3e%3crect%20width='24'%20height='24'%20fill='white'%20transform='translate(7%207)'/%3e%3c/clipPath%3e%3c/defs%3e%3c/svg%3e)


When I switched from Windows to Mac, taking a screenshot felt like decoding a secret. What used to be a simple Print Screen key now involved multiple shortcut combinations, and none were printed on the keyboard. I needed screenshots for everything: client presentations, UI bugs, course notes, even quick reminders. At first, I fumbled my way through trial and error, capturing either too much or not enough. In this guide, I’ll take you through how to screenshot on Mac the right way, from clean shortcuts to tools that make your captures look sharper and more professional.
Built-in Methods: How to Screenshot on Mac
If you know the shortcuts, you'll find that macOS offers more screenshot options than most people think. When I first switched, I thought that in order to have the same level of control as I did on Windows, I would have to install a third-party tool. However, after further investigation, I discovered that macOSalready had everything pre-installed. With a few keystrokes, you could capture entire screens or select small cropped portions. I'll explain each technique in this section so you can begin utilizing the one that best suits your requirements.
Many users are familiar with typing keywords into search bars, but fewer realize how effective it can be to upload photos to Google Image Search, especially when trying to identify visuals or track original sources. Just like screenshots, understanding the right steps can make a routine task much more efficient. Below are the best techniques I've found for getting clean, clear screenshots on macOS.
Capture the Entire Screen
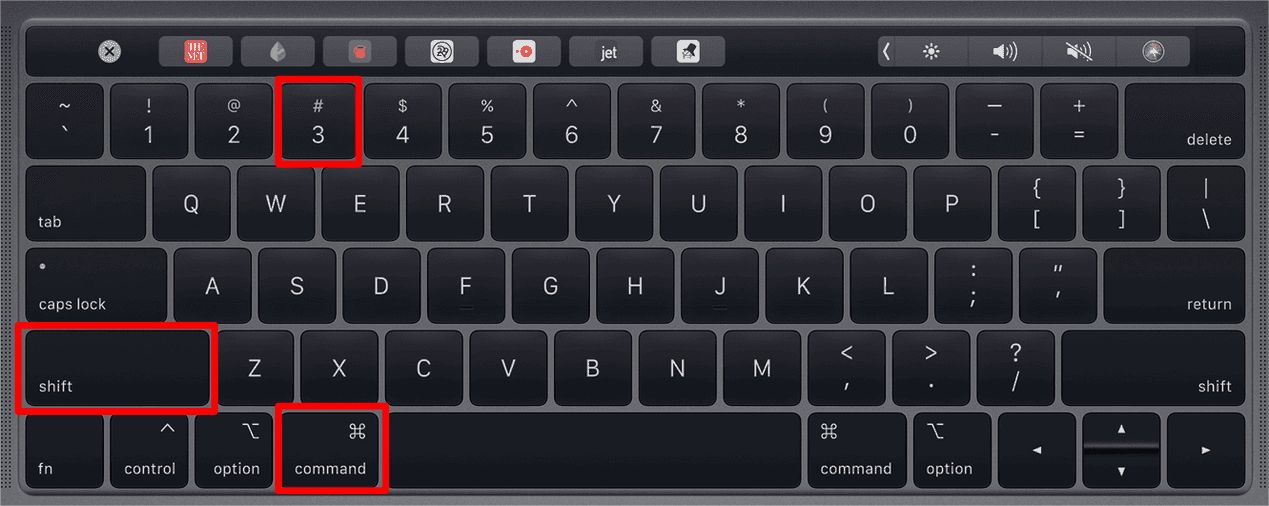
One of the first shortcuts I relied on when I needed a complete view of my desktop was Command + Shift + 3. It came in handy for everything from capturing full spreadsheets to saving presentation slides. I didn’t need anything fancy, just a quick way to preserve what was in front of me. What stood out about this shortcut was how instantly it worked and how consistent the results were. Even when you have multiple windows open, it never fails to give a clean, full-screen image. It’s a small thing, but when you're working fast and need accuracy, having that shortcut in your muscle memory is a lifesaver. Here’s how to screenshot on MacBooks:
Step 1: Press Command (⌘) + Shift + 3, the screenshot will then be automatically saved to your Desktop by default.
This method reminds me a bit of how to reverse image search on Google, where precision really matters. When sharing a specific part of a screen or isolating a chart, dragging to highlight just the necessary content is a game changer. It’s like narrowing down your image search to get better, faster results.
Capture a Selected Portion
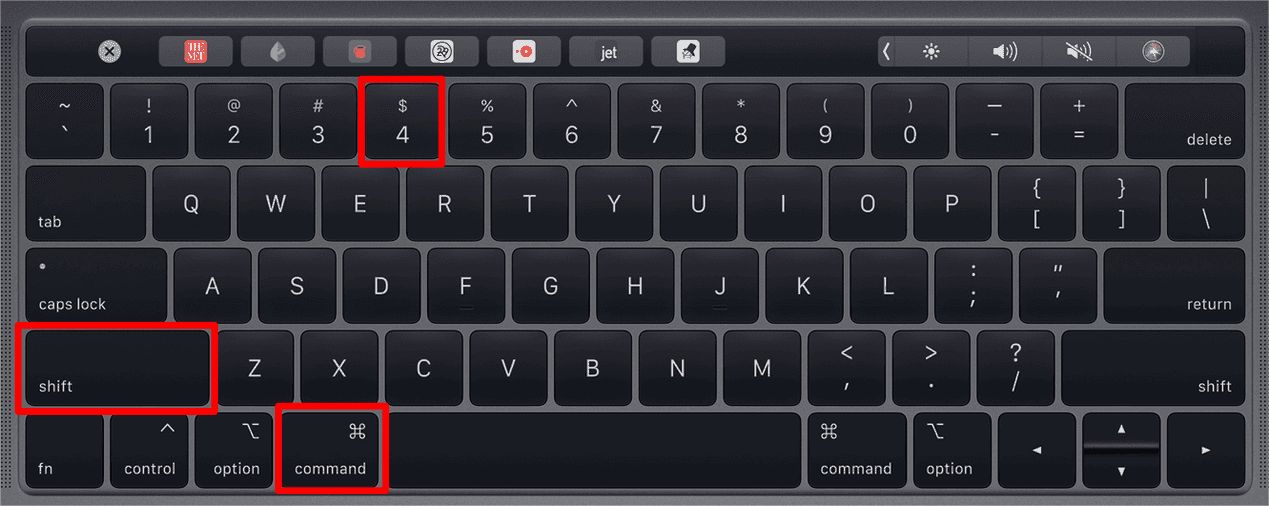
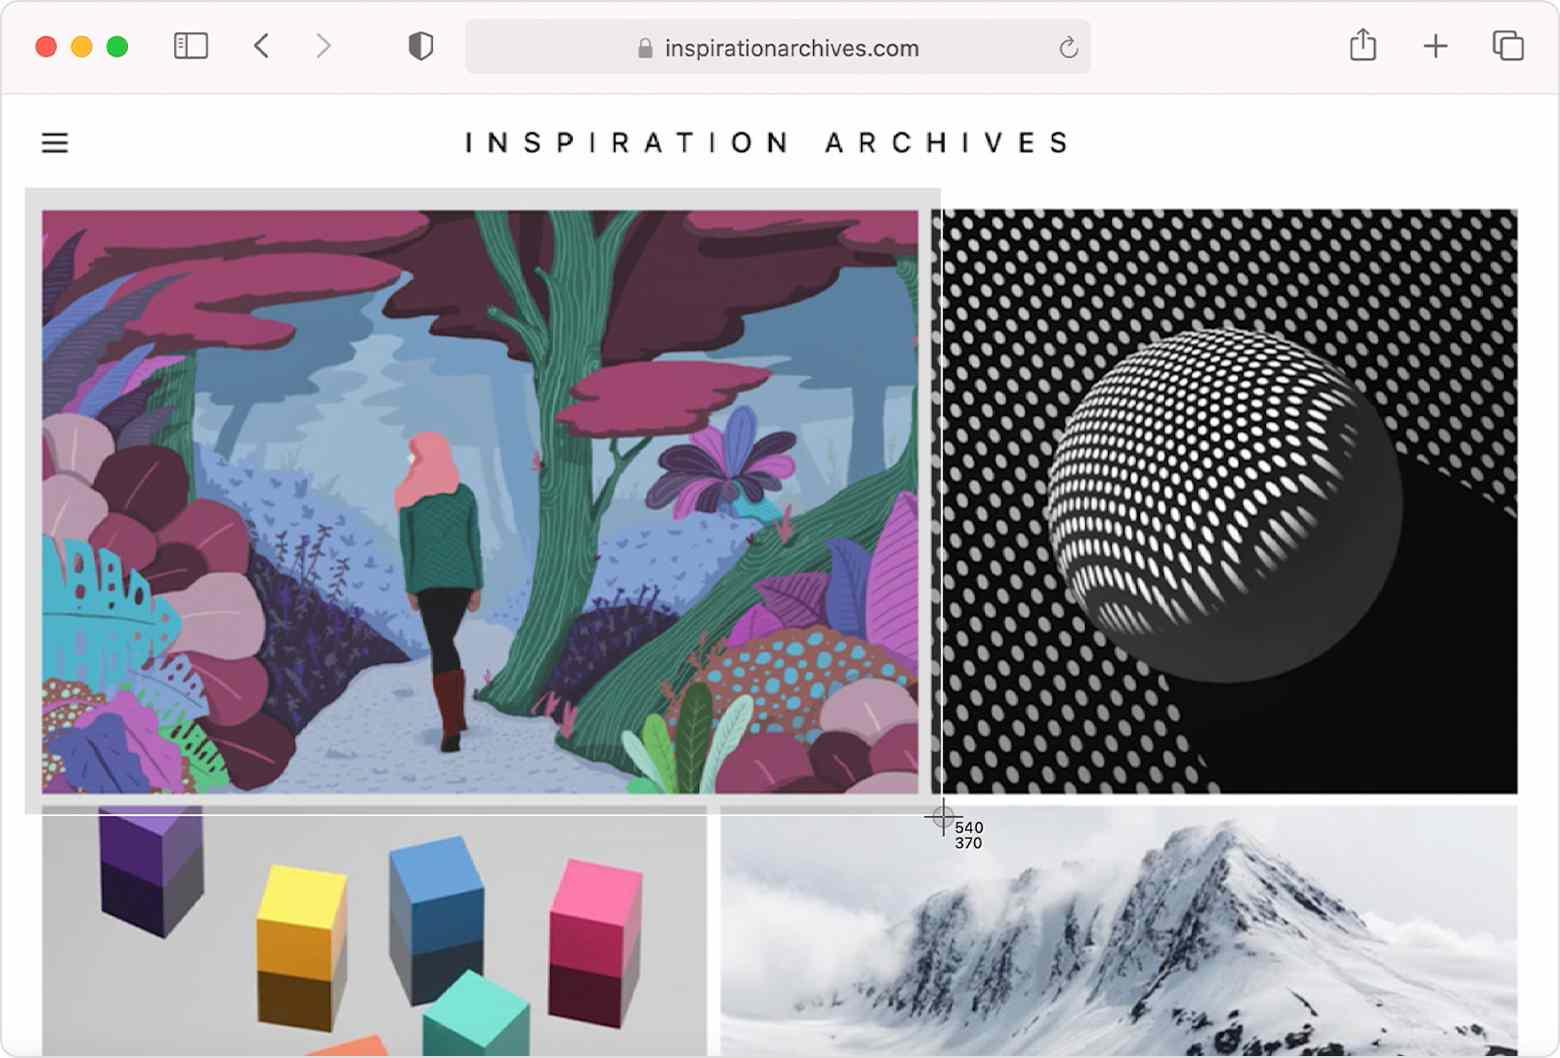
Sometimes you only need to show one part of the screen, not the whole thing. I ran into this often when creating tutorials or sharing snippets from websites. One time, I had to send just a chart from a long dashboard to a client. Instead of croppingafterward, using Command + Shift + 4 to select exactly what is required, saves a lot of time. The precision makes it easy to isolate the part that mattered. What really made it amazing was the control: dragging to highlight, seeing the pixel count, gives you confidence that the result will be clean, balanced, and easy to read.
Step 1: Press Command (⌘) + Shift + 4, your cursor then becomes a crosshair, allowing you to select the exact portion of your screen you want to capture.
Step 2: Using the cursor click anddrag to select the portion you want. Thenrelease the mouse to capture.
Using this method often feels as intentional as when you upload picture to Google for more targeted results. Instead of searching a full screen, you focus on one defined area, making it easier for others to understand what you're showing.
Capture a Specific Window
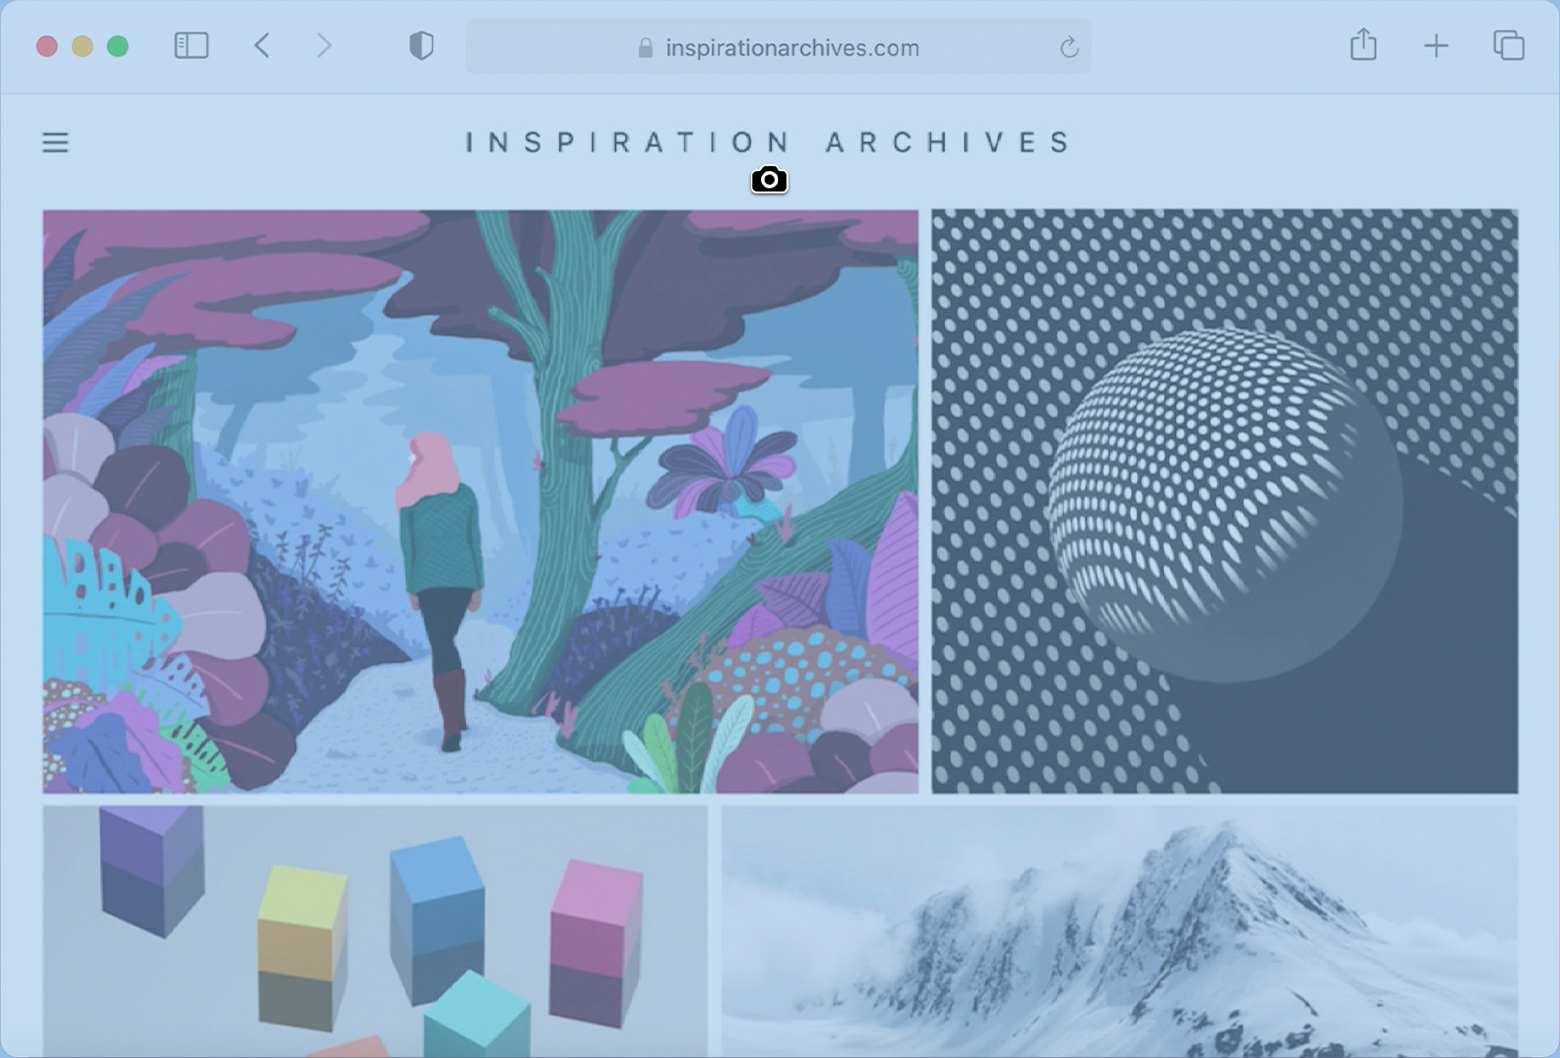
I remember working on a user guide where I had to highlight only app windows without background clutter. That’s when I started using the window-specific screenshot shortcut, Command + Shift + 4 followed by the Spacebar. At first, it seems like an extra step, but once you see how neat and professional the output looked, it might come in really handy. If you want to do something like app reviews, interface documentation, or design feedback, this shortcut will be really helpful. Here’s how you can screenshot a specific window:
Step 1: On your MacBook keyboard,Press and release the keysCommand (⌘) + Shift + 4 together.
Step 2: Then click on the Spacebar right after screenshot shortcut. Finally, hover over any window and click to capture it.
This feature is similar to performing an image search by photo on Google: everything you need is laid out clearly, with tools to fine-tune your results. It’s especially helpful when you want more than just a quick grab, you want control, timing, and output precision.
Use the Screenshot Toolbar
At one point, I was preparing a video walkthrough and needed more control, not just screenshots, but also quick access to screen recording and delayed capture. That’s when I discovered the Screenshot Toolbar. It felt like unlocking a hidden dashboard that did more than expected. It allows you to be able to set timers, choose save locations, and switch modes without remembering new shortcuts. If you like working with visuals and options in one place, this tool makes the whole process feel seamless. Here’s how you can use this shortcut:
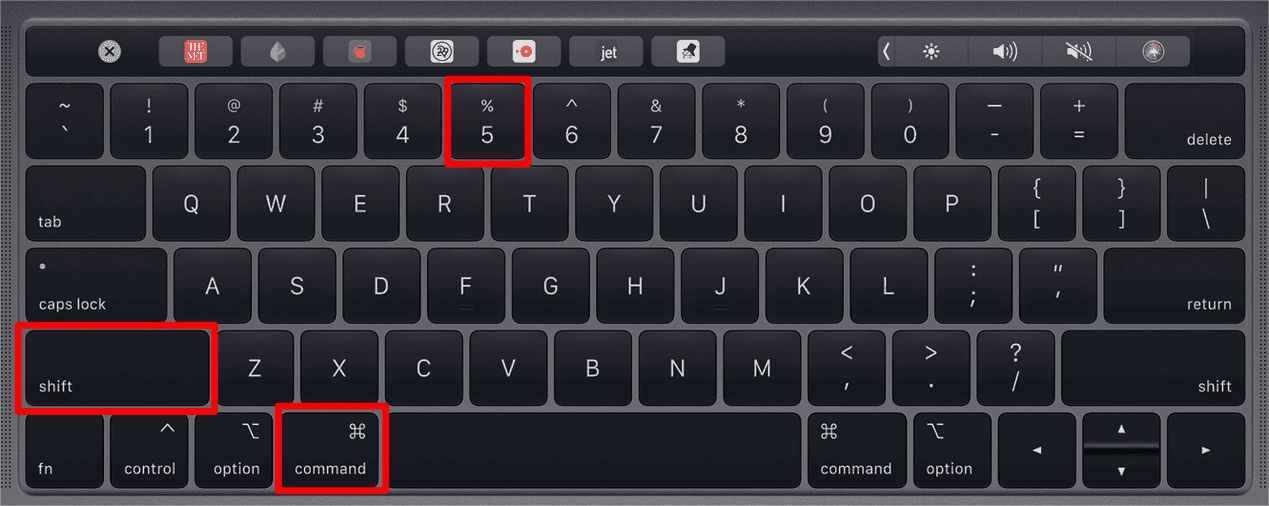
Step 1: On your MacOS, press Command (⌘) + Shift + 5 to open Screenshot control options.
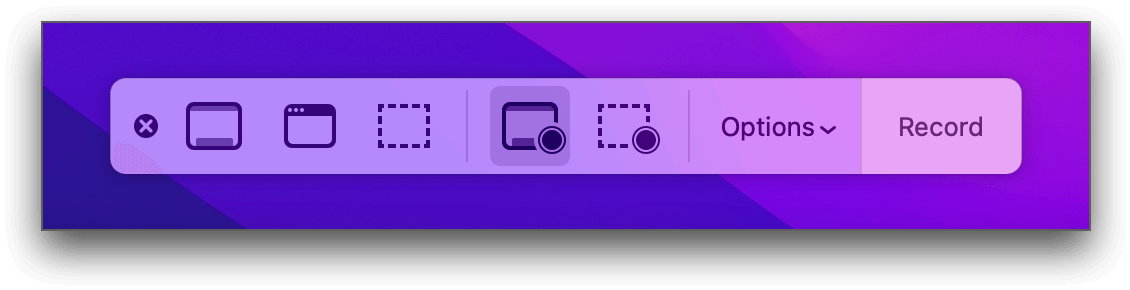
Step 2: Choose between capturing the entire screen, selected window, or portion.
Step 3: Click “Options” to set timer, save location, or enable/disable floating thumbnail, then hit“Capture”.
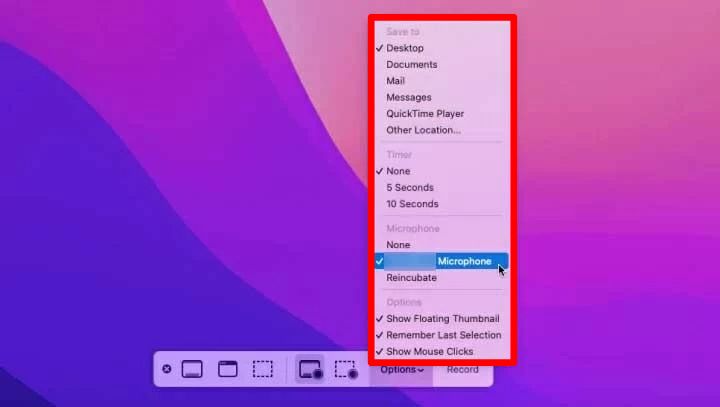
This is especially handy when you need flexibility, like adding a delay before the screenshot is taken. I find it useful during UI walkthroughs.
Use the Touch Bar (if available)
I didn’t use the Touch Bar much at first, but then a client asked for visuals of Touch Bar settings in action. That’s when I learned about this shortcut: Command + Shift + 6. It took a bit to get used to the idea of screenshotting such a narrow space, but for those specific needs, like showing volume controls, sliders, or Touch Bar customizations, this shortcut saved me. It might not be used daily, but when you need it, it’s the only clean option. Here’s how you can do it:
Step 1: Press Command (⌘) + Shift + 6, this enables you to capture a screenshot of your Touch Bar.
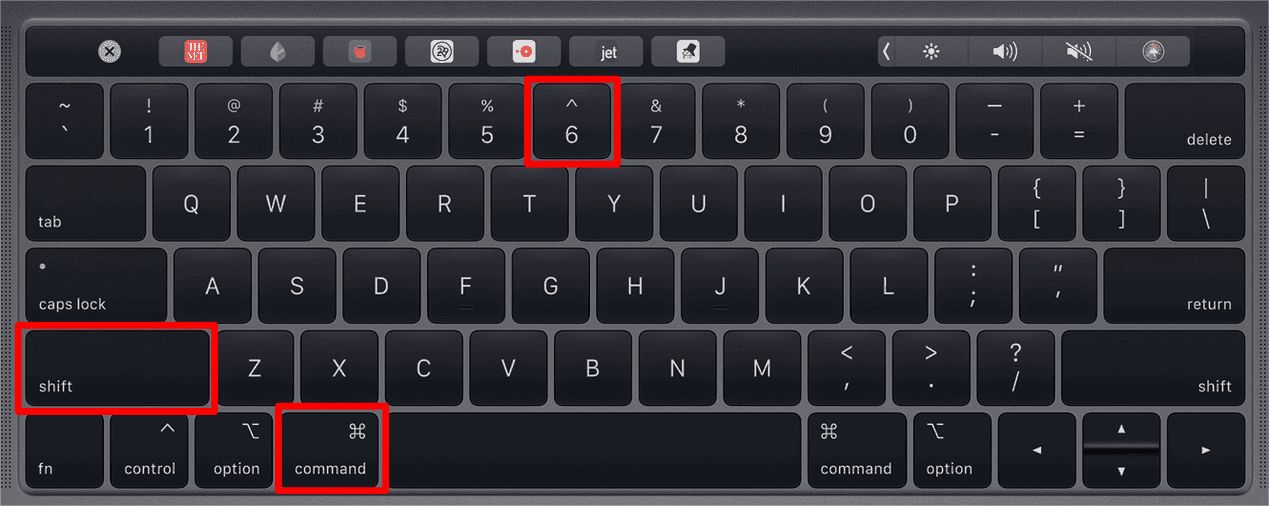
It’s niche, but I’ve used it when showing Touch Bar settings in tutorials for tech support guides.
Adjust Where Screenshots Are Saved
Particularly during hectic projects, desktops can easily become overloaded with sporadic screenshots. Thankfully, macOS provides a simple method for altering the default save location. Organizing and managing things is made easier by rerouting screenshots to a specific folder, such as one for a client or project. When working with screenshots on a regular basis, this minor change has a significant impact. Here’s how you can adjust where screenshots are saved:
Step 1: Open “Screenshot Toolbar” using the shortcut Command(⌘) + Shift + 5
Step 2: Click “Options” and under the “save as” section choose a new location like Documents or Mail.
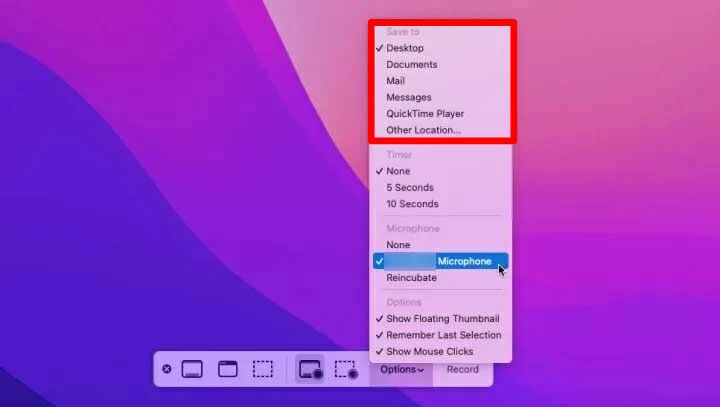
I keep mine saved to a custom “Screenshots” folder to keep my desktop clean.
How to Customize Screenshot Shortcuts on Mac
I once had a project that required me to take dozens of screenshots every hour, and the built-in Mac shortcuts weren't working well, especially since I had a wrist injury that required one-handed access. I looked into macOS settings at that point and found that you could alter screenshot shortcuts to fit your workflow. Although it may seem like a minor adjustment, altering the key combinations made everything run more smoothly and quickly. This feature is revolutionary if you're using a Windows keyboardon a Mac or just want more ergonomic access. Developers, designers, and anyone else who takes a lot of pictures will find it especially useful. Here's how I set mine up, and here's how you can too.
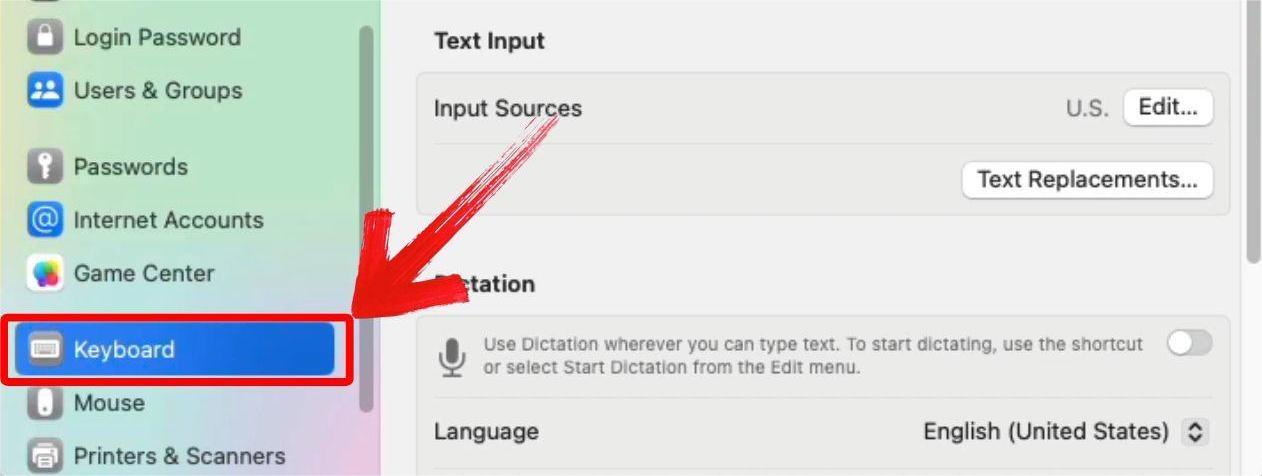
Step 1: Open “System Settings” then go to “Keyboard”.
Step 2: Click “Keyboard Shortcuts”
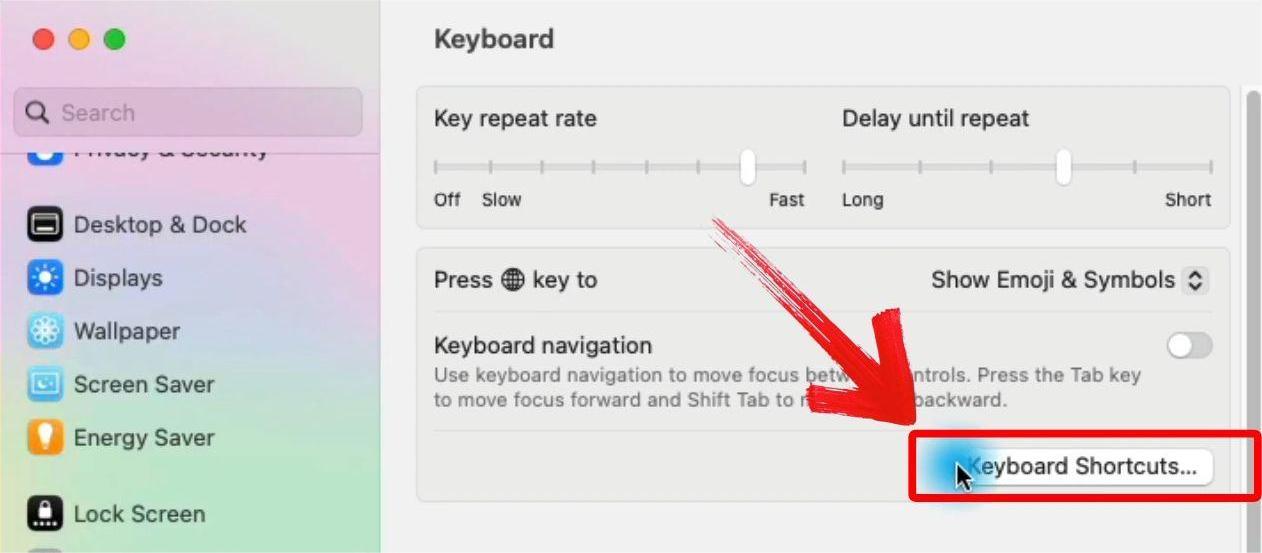
Step 3: Select“Screenshots” in the sidebar and double-click the shortcut you want to change
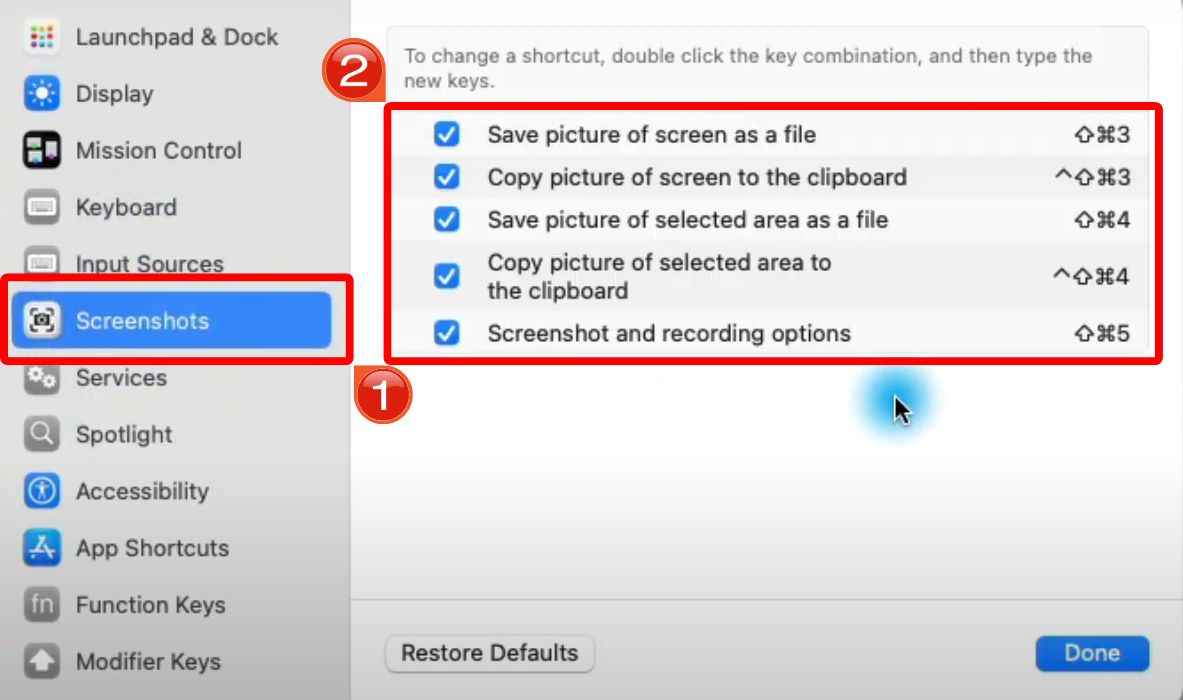
Step 4: Type your new key combination andhit “Done”.
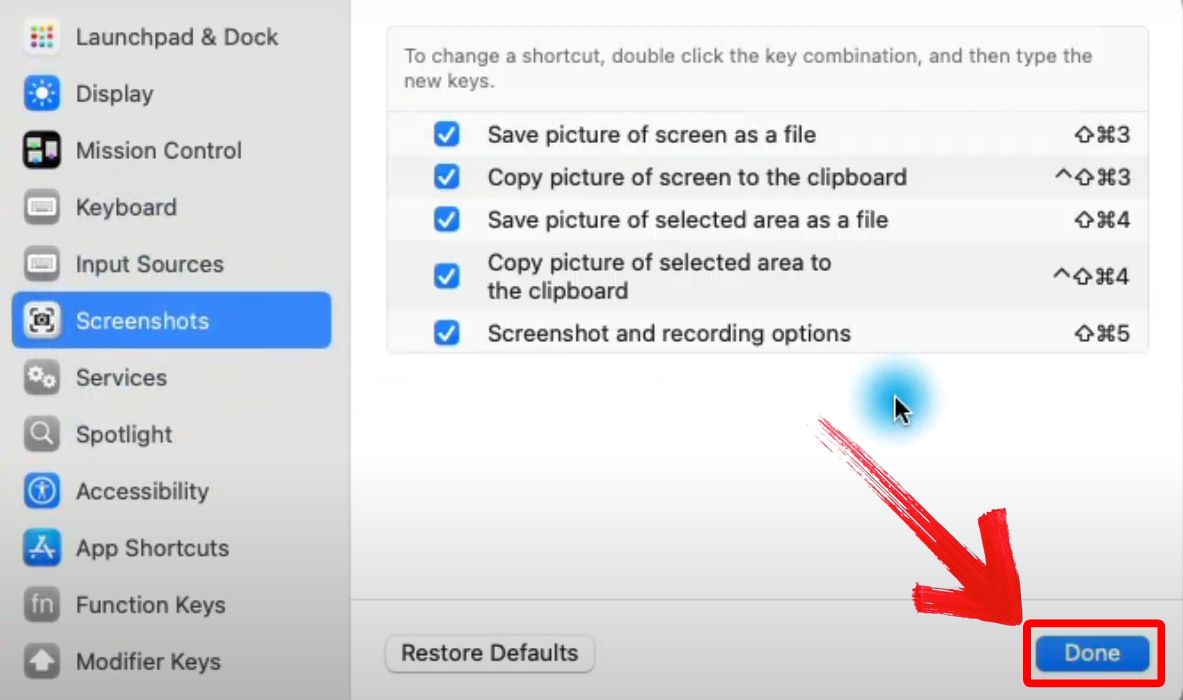
This is great if you’re using a Windows keyboard or want easier keys. I switched mine to use F-keys for faster access while coding.
Bonus Tool – Toolsmart Free Image Enhancer Online
Sometimes, screenshots look dull, washed-out text, uneven brightness, or slight blur. This used to be frustrating, especially when I needed to share clear visuals in tutorials or job applications. That’s where Toolsmart’s Free Image Enhancer made a big difference.
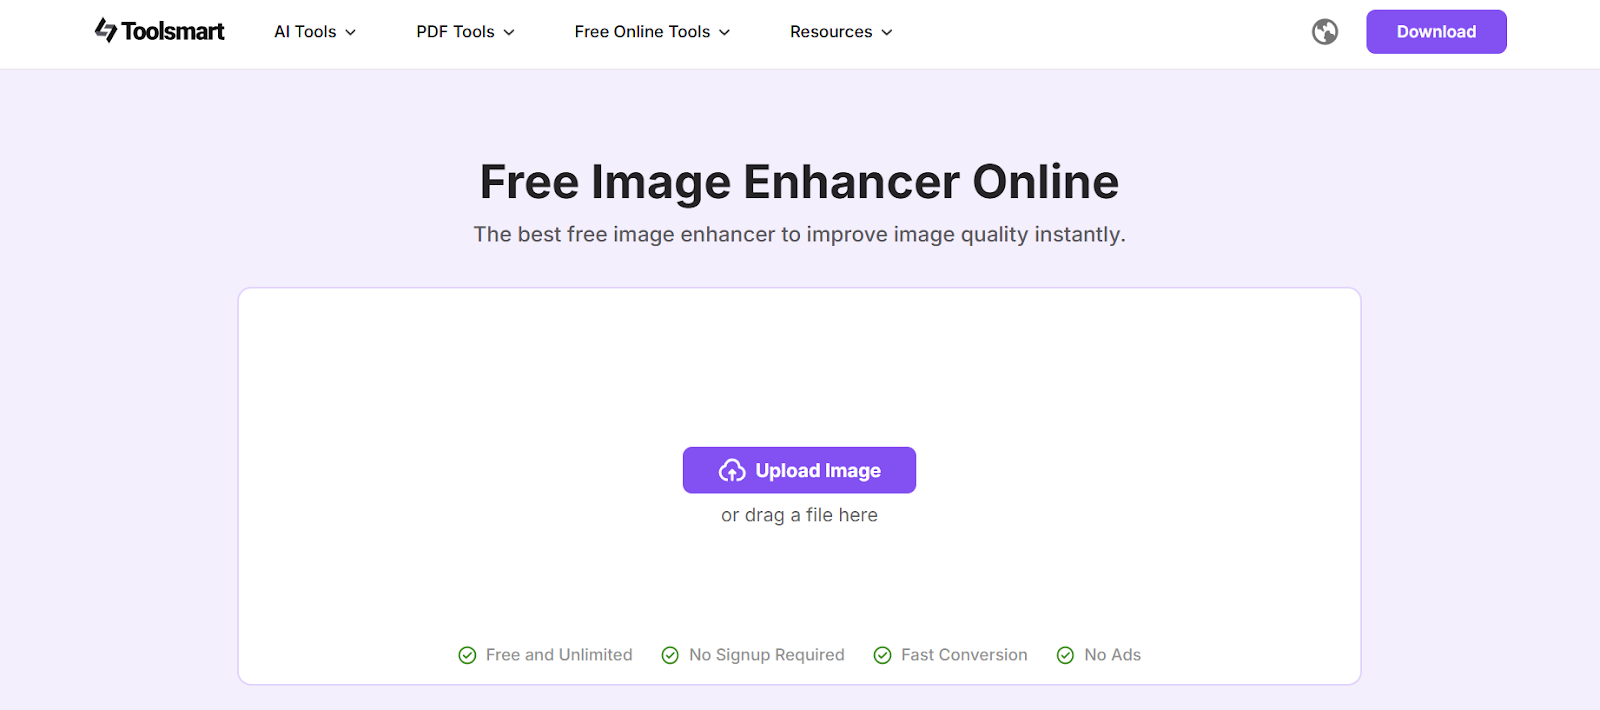
It’s a browser-based tool that uses AI to sharpen, brighten, and clean up your screenshots with almost no effort. I’ve used it multiple times before uploading images to platforms like Google Drive, Notion, or email newsletters. The difference in quality, especially for document or app screenshots, is instantly noticeable.
Features:
Automatically enhances sharpness, color balance, and contrast
Works on all browsers without downloading anything
Ideal for screenshots of documents, websites, or app interfaces
Pros:
Doesn’t require login or leave a watermark
Completely free with no registration
Fast processing (under 10 seconds)
Great for both low-res and high-res screenshots
Cons:
Only handles one image at a time (no batch upload)
Doesn’t offer cropping or markup
It’s now part of my routine, especially for product tutorials or blog posts where clarity matters.
How to Use Toolsmart Free Image Enhancer Online
While attempting to clean up a series of screenshots for a software tutorial, I discovered Toolsmart's Free Image Enhancer. Some of them didn't look as sharp as I needed, had fuzzy text, or had uneven brightness. I tried this tool because I didn't want to launch an entire editing program just to sharpen a few photos. Its speed and light weight were the first things that caught my attention. In just a few seconds, I could upload a screenshot, let the AI work its magic, and receive a crisper, more polished version. It comes in particularly useful when tidying up user interface screenshots or webpages where clarity is crucial. Additionally, there is no setup required because it is browser-based, just drag, drop, and download. Here’s some steps to use Toolsmart’s Image Enhancer:
Step 1: Visit Toolsmart Image Enhancer on your browser.
Step 2: Click on “Upload Image” and select the screenshot you want to enhance.
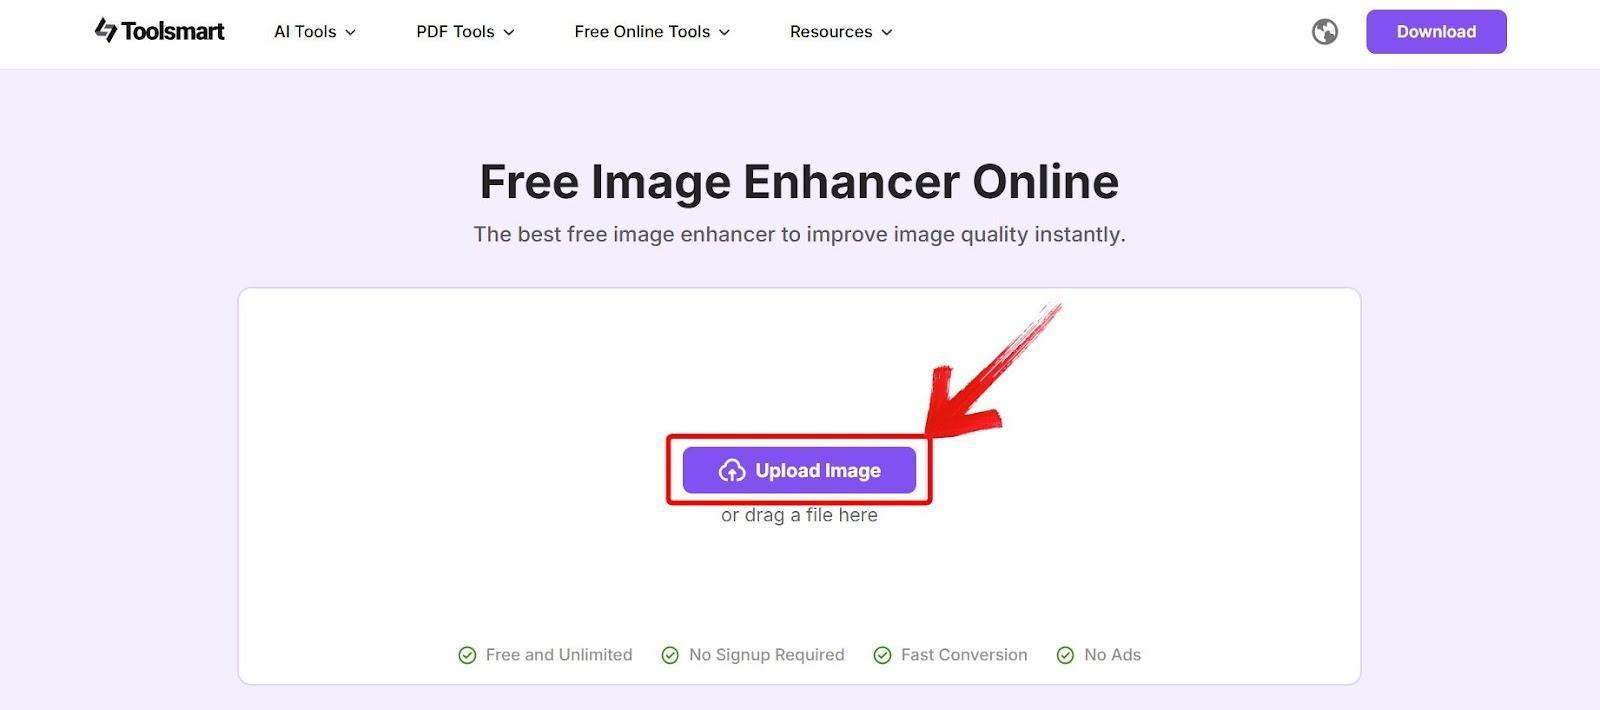
Step 3: Wait 5 to 10 seconds while the tool enhances your image, then preview the clearer version andclick on “Download” to save it.
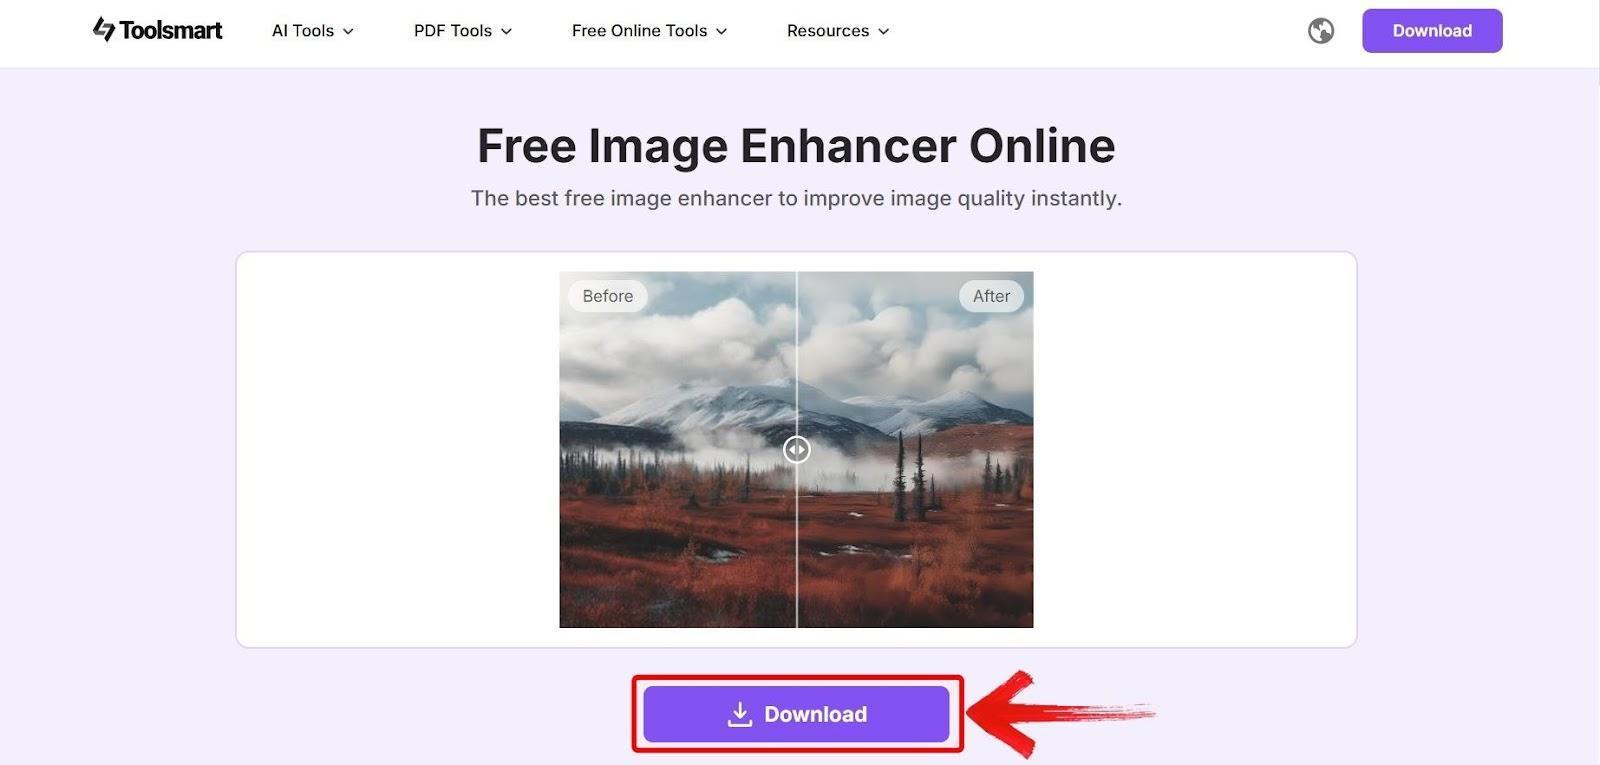
I’ve used it for everything from Zoom meeting captures to portfolio screenshots. The cleaner edges and color balance make a noticeable difference, especially when viewed on high-res screens.
FAQs
Q1: Where do my Mac screenshots go?
They’re saved to the Desktop by default. You can change this in the Screenshot toolbar under “Options.”
Q2: Can I annotate my screenshots on Mac?
Yes. Use the Markup tool that appears in the floating thumbnail or open the screenshot in Preview.
Q3: How can I make my screenshot clearer?
Use Toolsmart’s Free Image Enhancer to sharpen, brighten, and fix low-quality screenshots.
Q4: Is Toolsmart really free?
Yes, it requires no payment, login, or installation.
Q5: Does Toolsmart work in Safari or Chrome on Mac?
It works in all major browsers including Safari, Chrome, and Firefox.
Choosing the Best Way to Screenshot on Mac
Learning how to screenshot on Mac efficiently changed how I work, from sending quick feedback to building entire tutorials. The built-in shortcuts give you full control over how and what you capture, while the ability to customize keys makes the process even smoother. But just as important as taking the screenshot is making sure it looks clean and professional. That’s why pairing these methods with Toolsmart’s Free Image Enhancer Online has become a regular part of my workflow. Even if you're in school, working as a freelancer, or managing a business, knowing how to take a good Mac screenshot can help you save time and enhance your visual communication.


