You take a photo you actually like, framing’s good, lighting’s on point, but when you look closer, it’s a little soft. Not completely blurry, just not as sharp as it should be. So you open up Photoshop, thinking it’ll be a quick fix. Instead, you're looking at a bunch of sharpening tools that all sound similar but do completely different things. In this guide, I’ll show you exactly how to sharpen an image in Photoshop properly, and for anyone who wants something faster, there’s also a free AI tool that handles it in seconds.
How to Sharpen an Image in Photoshop (Step by Step)
When I first tried figuring out how to sharpen image in Photoshop, I thought it would be as simple as hitting a button. Turns out, there’s more than one way to do it and each tool gives you a different kind of result. Some methods are great for portraits, while others work better for landscapesor product shots. These are the three main tools I’ve found most useful: Unsharp Mask, Smart Sharpen, and High Pass Filter. Each one has its own strengths, and once you understand how they work, sharpening becomes a lot more intuitive.
Unsharp Mask
Unsharp Mask was the first sharpening tool I ever used in Photoshop, mostly because it looked the least intimidating. Despite the name, it actually sharpens your image by increasing contrast along the edges. It’s quick and gives you a decent amount of control without overwhelming you with too many settings. I’ve found it helpful for portraits and everyday photos that just need a little extra clarity. Here’s how I use it.
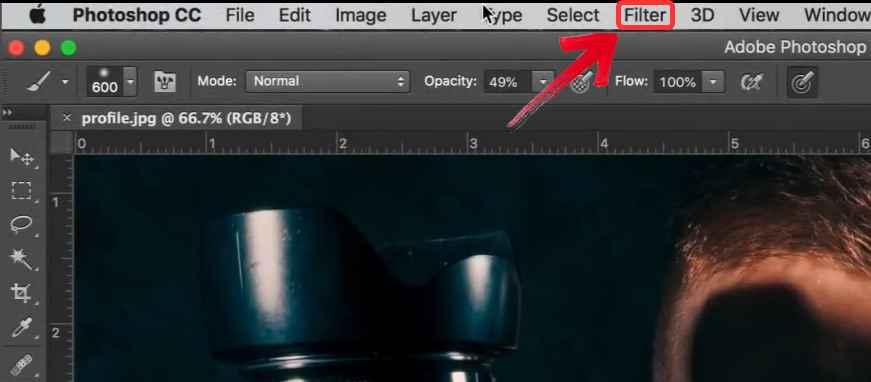
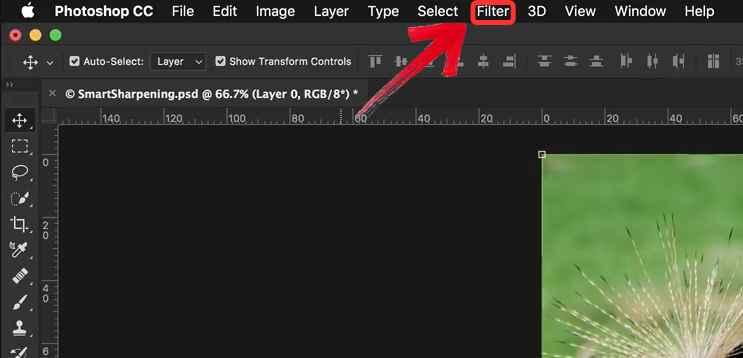
Step 1: Open your photo in Photoshop and click on“Filter” in the top menu bar.
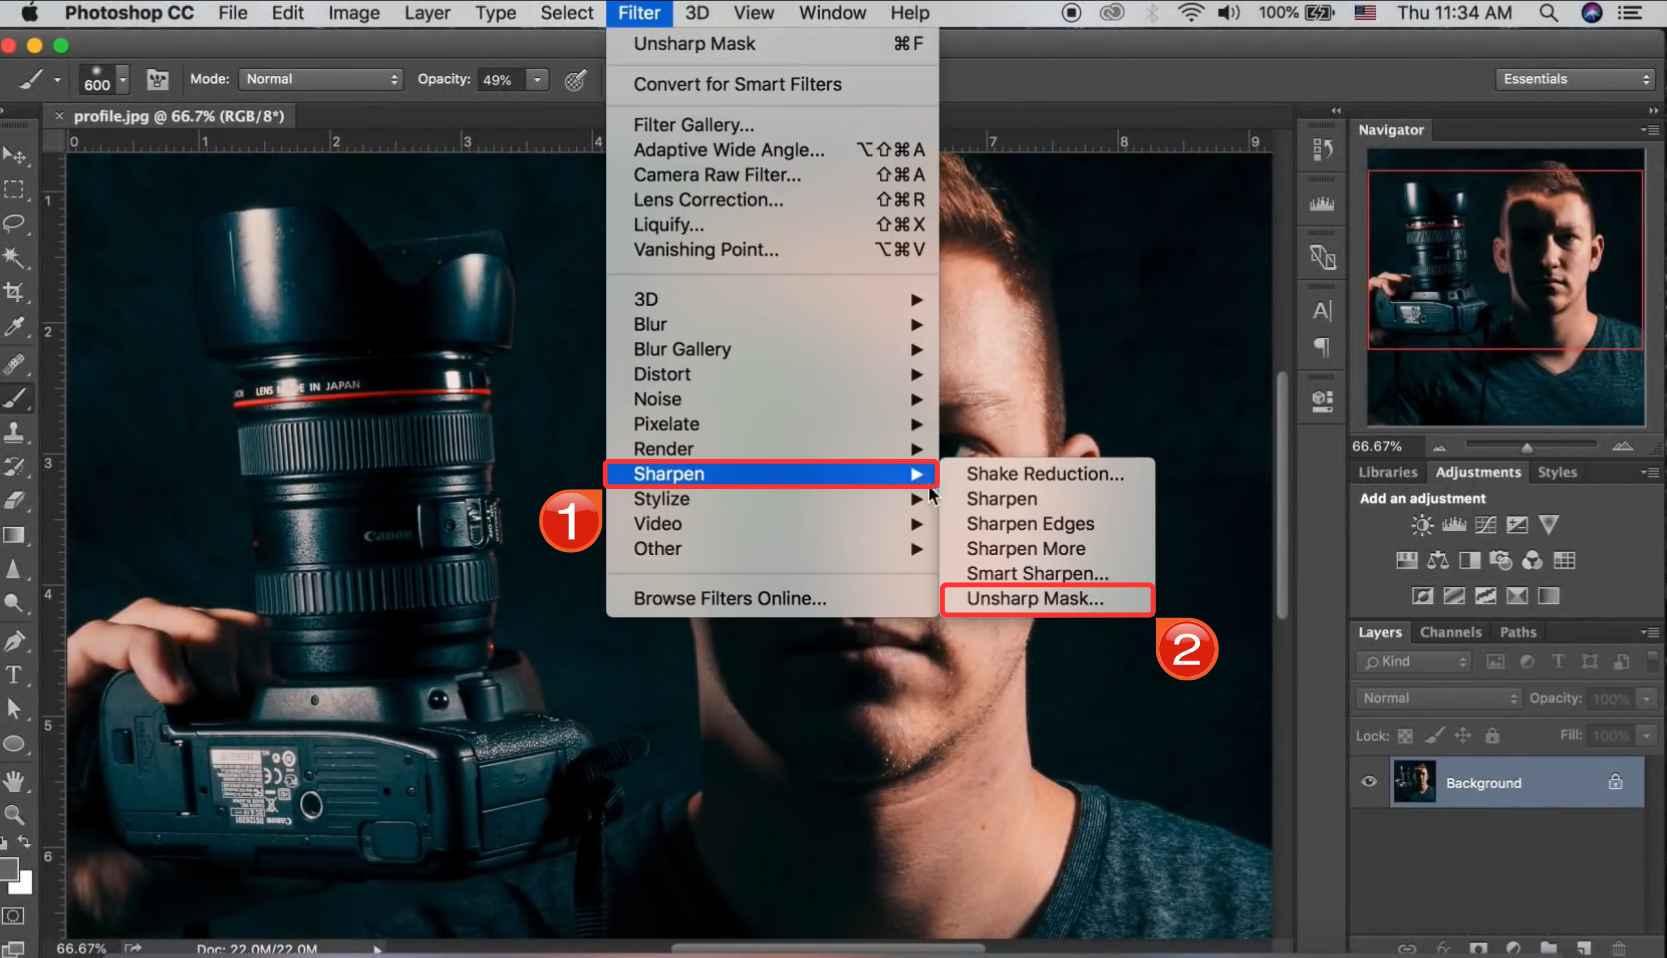
Step 2: From the dropdown, hover over“Sharpen” and then click on “Unsharp Mask”. A new dialog box will open.
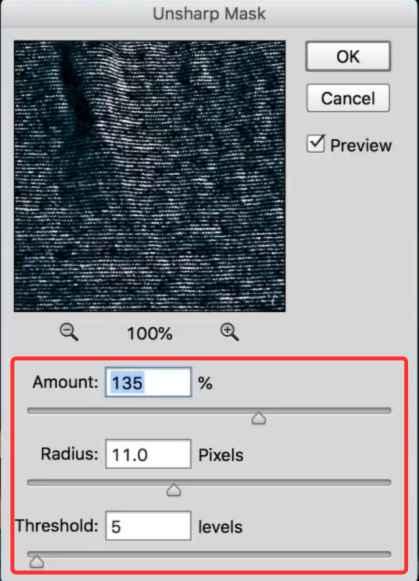
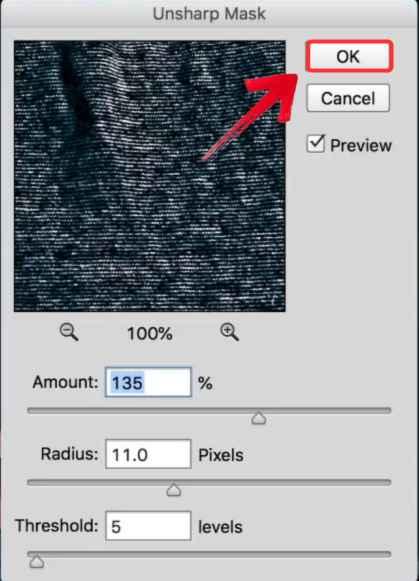
Step 3: Start adjusting the sliders:
Amount controls how strong the sharpening effect is. A good starting point is around 150%.
Radius affects how many pixels around the edges are sharpened. Keep this between 1–2 pixels for subtle clarity.
Threshold tells Photoshop which parts to ignore, this helps avoid sharpening noise. A value between 0–10 usually works well.
Step 4: Once it looks right, click“OK” to apply the sharpening. You can undo or adjust as needed if you're working on a duplicate layer
I usually turn to Unsharp Mask when I’m editing portraitsor casual photos that just need a little clarity. For example, if I’m working on a headshot that looks slightly soft maybe due to lighting or a subtle focus miss, Unsharp Mask helps bring out the eyes and edges without overdoing it. It’s also my default option for quick sharpening on social photos or anything that doesn’t need fine-tuning.
Smart Sharpen
After getting comfortable with Unsharp Mask, I started using Smart Sharpen when I wanted more precision for photos where I needed to preserve subtle details. Smart Sharpen gives you more settings to play with, which can seem a bit much at first, but it’s worth it if you're working with higher-resolution images or photos taken in low light. I tend to use it for landscape shots or anything that needs a cleaner, more polished look without overdoing it. Here’s how I use it.
Step 1: Open your photo in Photoshop and click on“Filter” in the top menu bar.
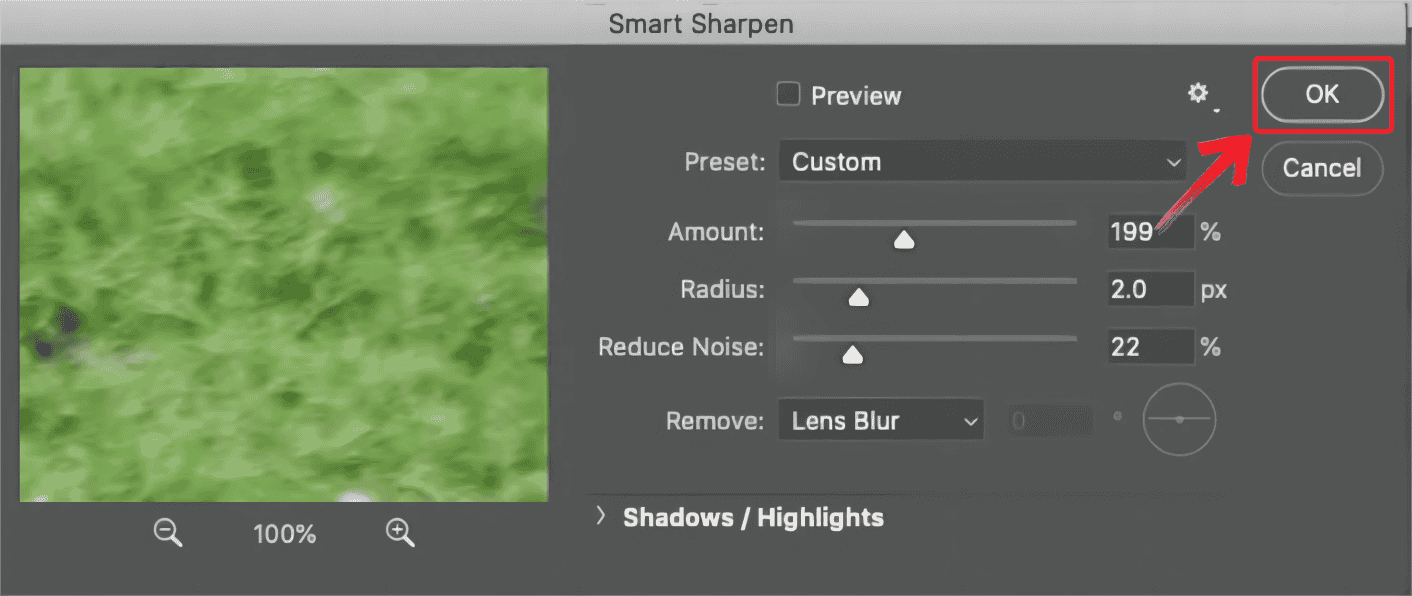
Step 2: From the dropdown, select“Sharpen” and then click on “Smart Sharpen”. A new dialog box will open.
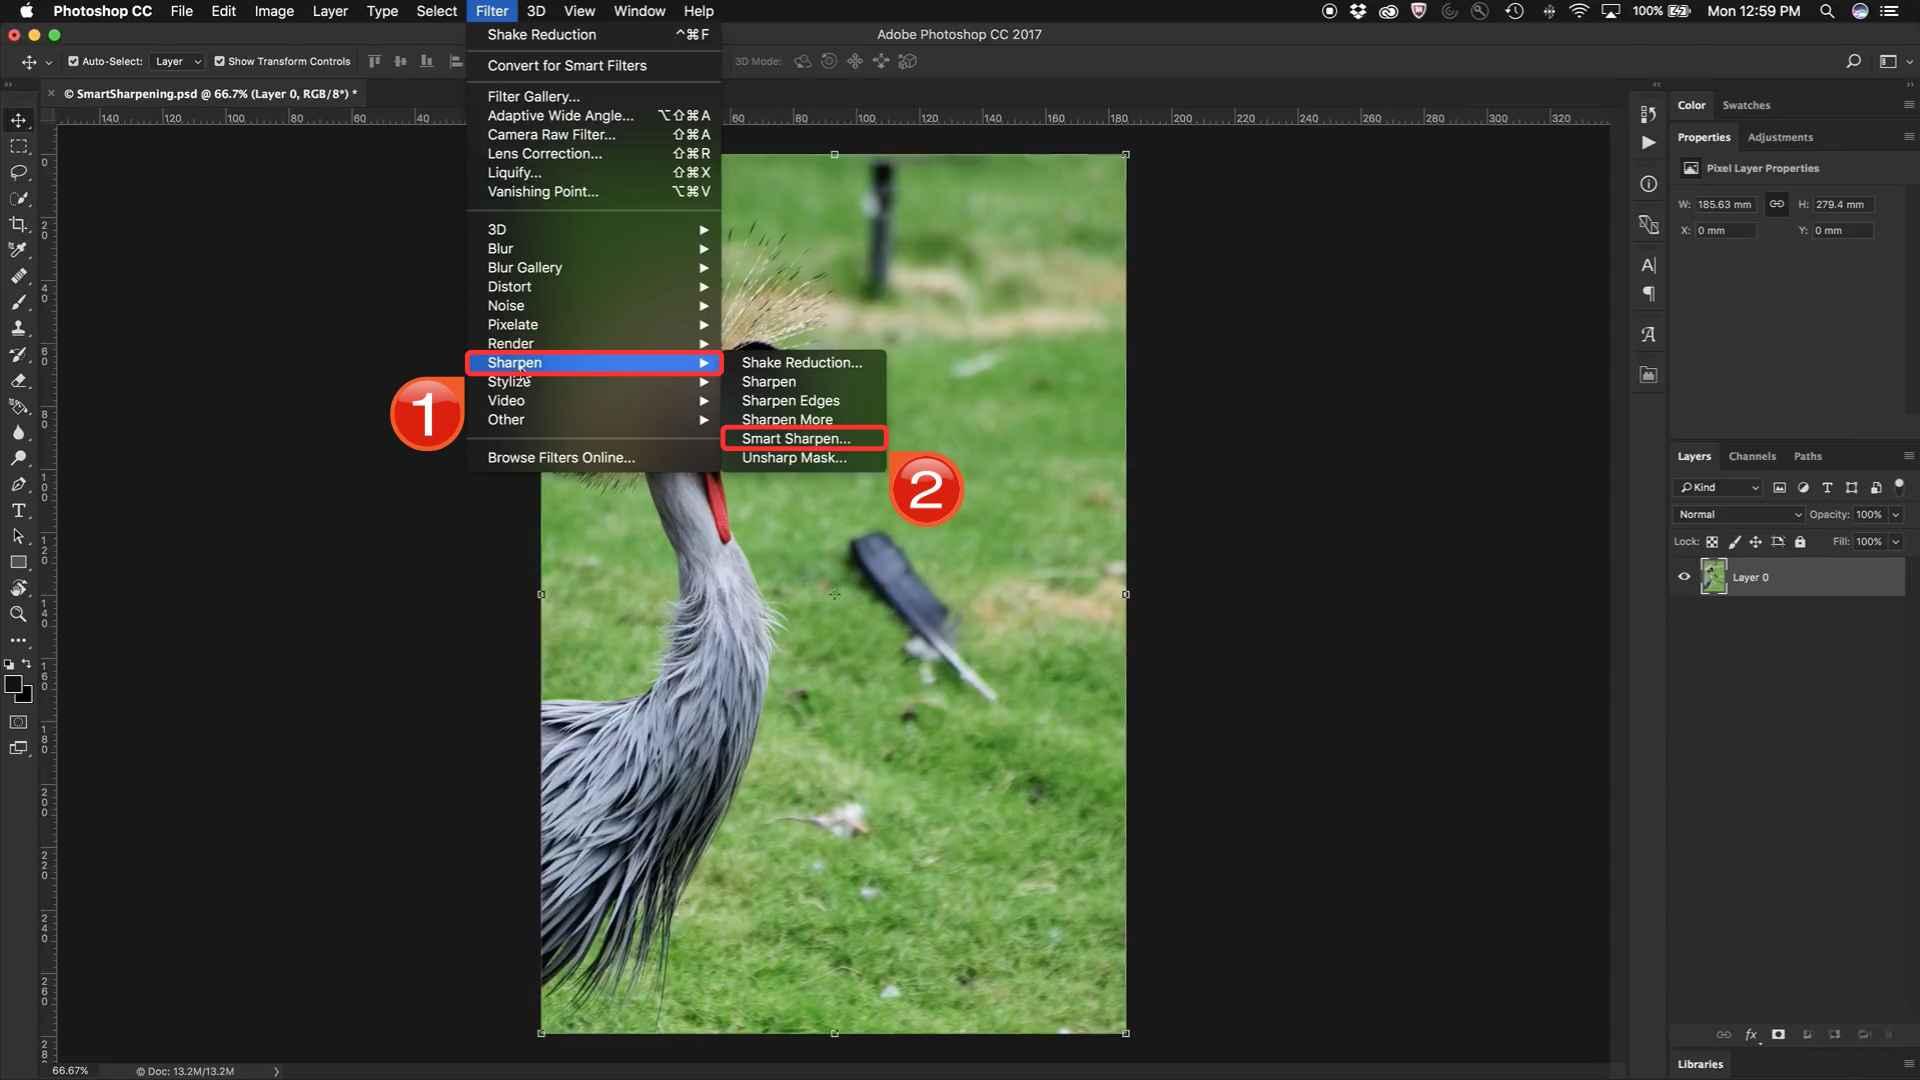
Step 3: Begin with the basic settings:
Set the Amount to around 150% for visible sharpening.
Adjust the Radius to about 1.5–2 pixels for most images.
Drag the Reduce Noise slider to about 10–20% to smooth out unwanted texture.
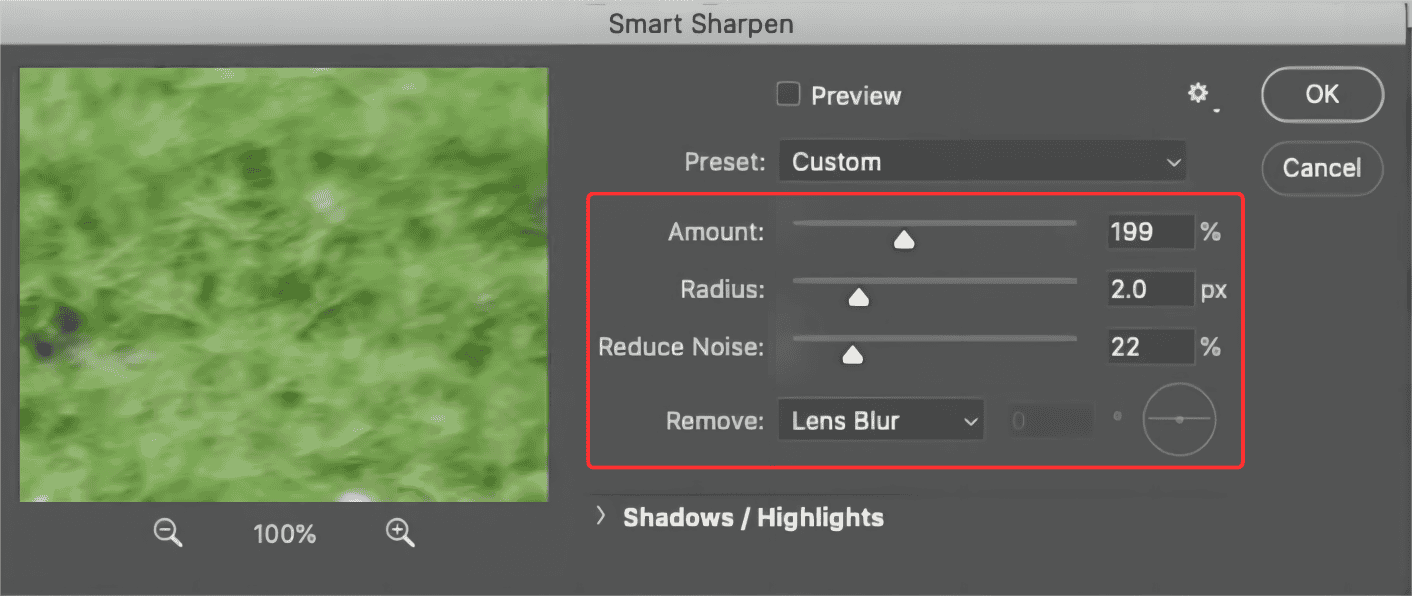
Step 4: Once everything looks good, clickOK. You’ll see the sharpening applied as a Smart Filter, ready to edit or toggle off if needed.
Smart Sharpen gives me more control, so I use it for detailed images like landscapes or night shots where I want to preserve texture without introducing noise. It’s useful when the photo was taken in low light or at a high ISO, and I want to reduce grain while still enhancing sharpness. I’ve also used it for architecture shots where the lines need to stay crisp without looking unnatural.
High Pass Filter
The High Pass Filter felt a little unconventional at first as it’s more visual than slider-based but it quickly became one of my favorites. What makes it different is how much control you get using blend modes. Instead of sharpening in a traditional sense, it lets you overlay edge detail on your photo in a way that feels much more hands-on. I reach for this method when I’m working on product images or need sharper lines without creating noise. Here's how I use it.
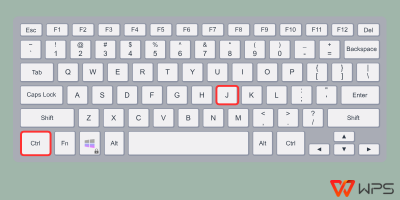
Step 1: Open your photo in Photoshop and duplicate your image layer by pressing Ctrl+J. This copy is where you’ll apply the sharpening.
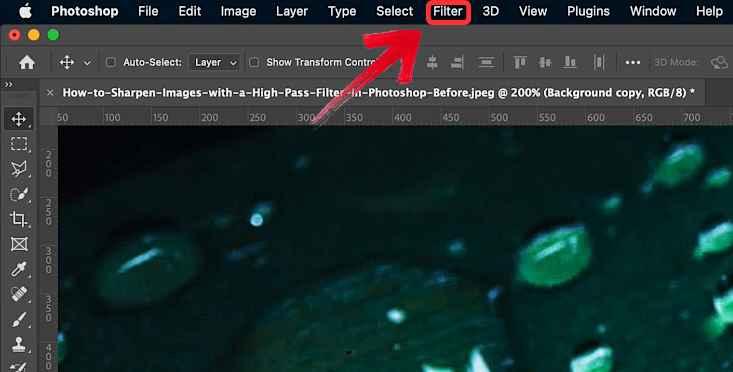
Step 2: With the duplicated layer selected, go to the top of the screen and click on “Filter” in the main menu to start applying the sharpening effect.
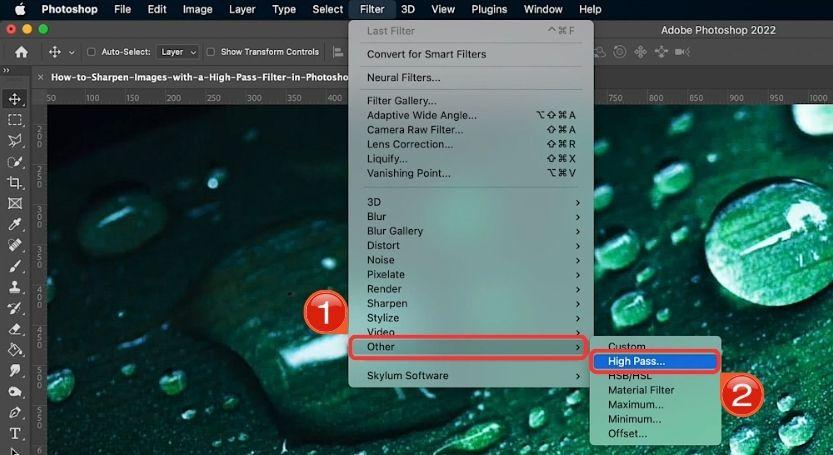
Step 3: From the dropdown, click“Other” and then select “High Pass”. A new dialog box will open.
Step 4: Set the Radius to somewhere between 2–5 pixels. The higher the radius, the stronger the sharpening. For portraits, stay closer to 2; for textures or products, you can go higher.
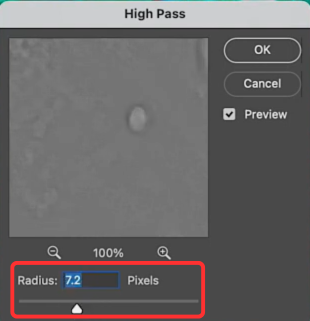
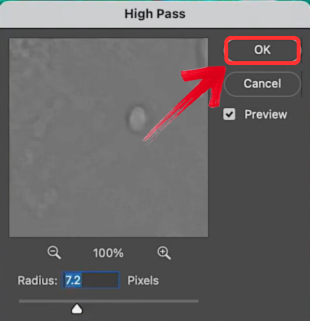
Step 5: Once you’ve set the radius and the preview looks good, click “OK” to apply the High Pass filter. Your image will now appear gray with visible edge outlines.
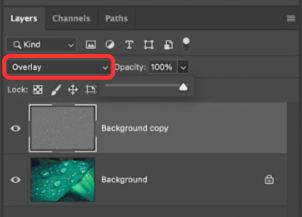
Step 6: Make sure that the duplicated layer’s blend mode is set to “Overlay” in the Layers panel.
When I’m working on product images or anything with strong lines like packaging, flat lays, or even UI screenshots, I usually go with the High Pass method. It gives me more control over how the sharpening blends in with the image, and it’s great when I’m already working with multiple layers. If you’re learning how to sharpen a photo in Photoshop with lots of texture like fabric or paper, this method works well. It helps bring out the fine details in a way that feels more precise than the other tools.
Another Helper – Toolsmart AI Image Enhancer
There were a lot of times when I didn’t need the full flexibility of Photoshop, just a quick way to sharpen a photo that looked a little soft. This came up often with older photos, screenshots, or images I planned to post on social media without spending time editing. I tried a few web-based tools, but most either compressed the image or didn’t do much at all. One of the few that actually worked for me was Toolsmart’s Image Enhancer. I uploaded a low-res portrait that Photoshop had trouble cleaning up, and it managed to sharpen it without introducing weird noise or artifacts. It handled the sharpening well without forcing me to adjust a bunch of settings or compromise image quality.
Features:
It requires no editing knowledge, making it ideal for beginners who want fast results.
The tool runs entirely in your browser, so there's no need to download or install anything.
It uses AI to automatically detect and sharpen blurryareas without manual input.
It supports common file formats like JPG and PNG for both upload and download.
Pros:
Easy to use for complete beginners
No installation or login required
Great for quick fixes and casual edits
Works well on low-resolution or slightly blurry images
Doesn’t require any Photoshop or technical experience
Cons:
Offers limited control compared to Photoshop
Not ideal for high-end or professional image retouching
No batch processing option for multiple images at once
All of these features make Toolsmart a practical choice when you just want sharper images without digging through complex tools. It’s helpful when you’re short on time or working on a device without Photoshop installed. And if you’ve ever wondered, how do I sharpen an image in Photoshop versus using a quick AI tool, this gives you a side-by-side sense of both. If you’re curious about how it works in action, here’s exactly how to sharpen an image using Toolsmart.
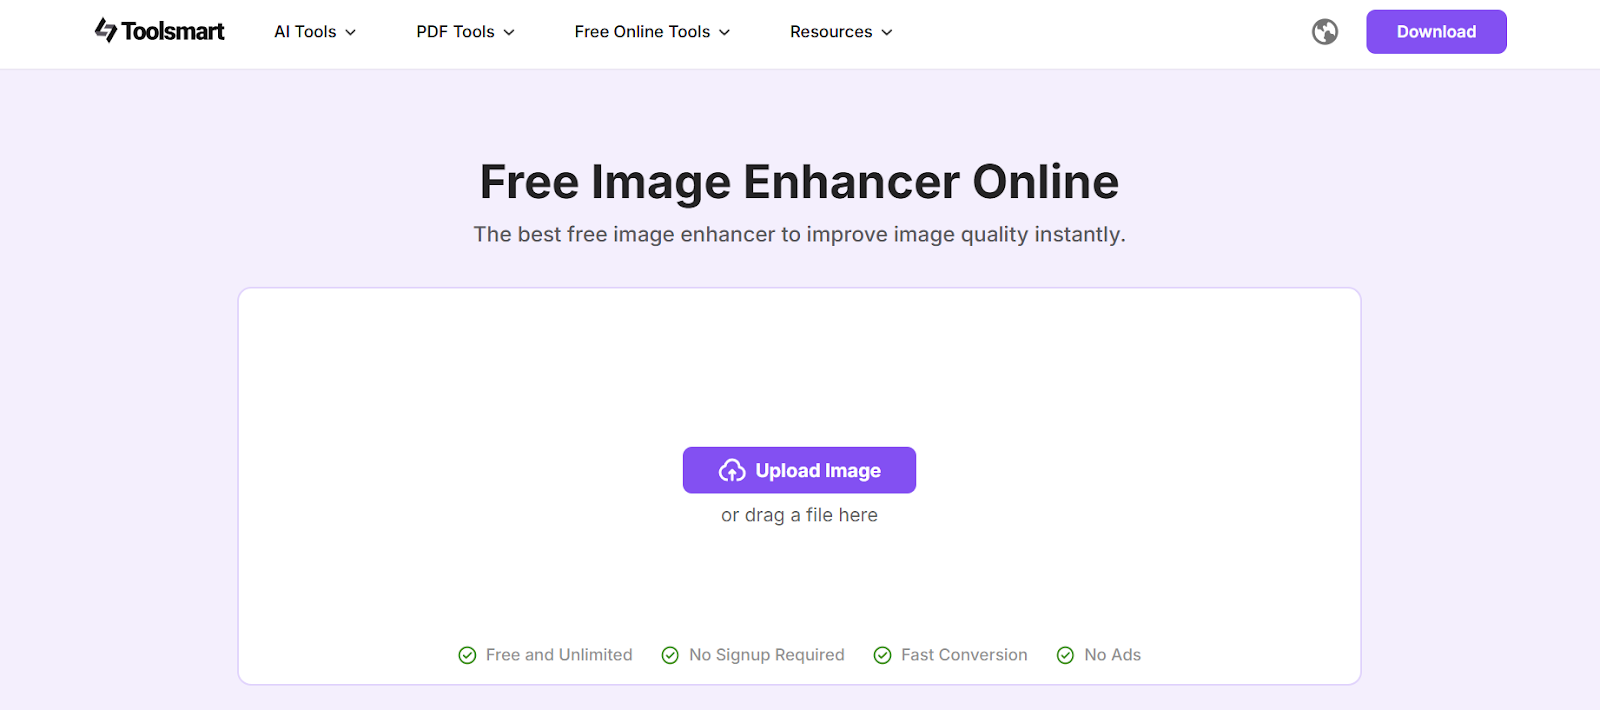
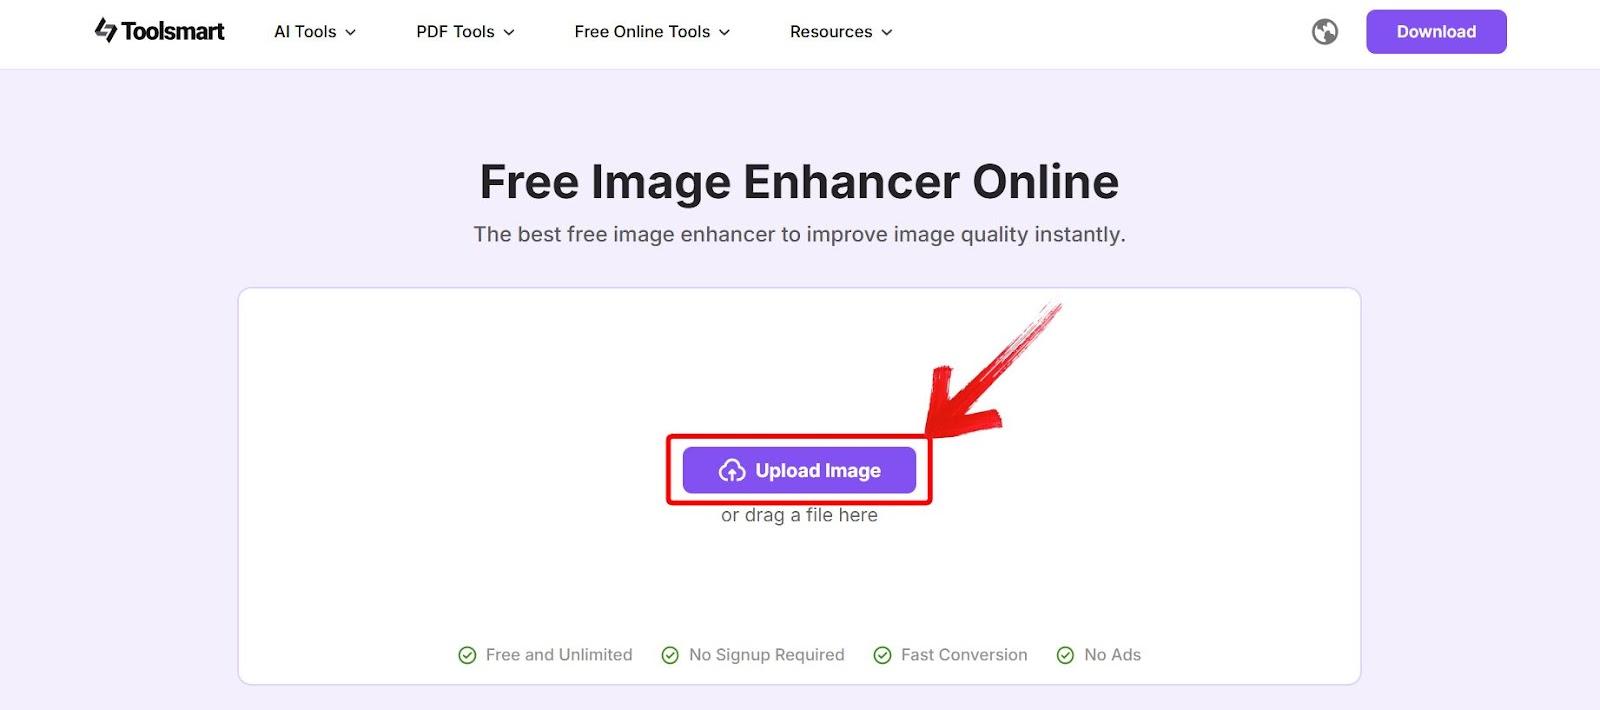
Step 1: Go to Toolsmart’s Image Enhancer website and click on “Upload Image” to select your blurry photo.
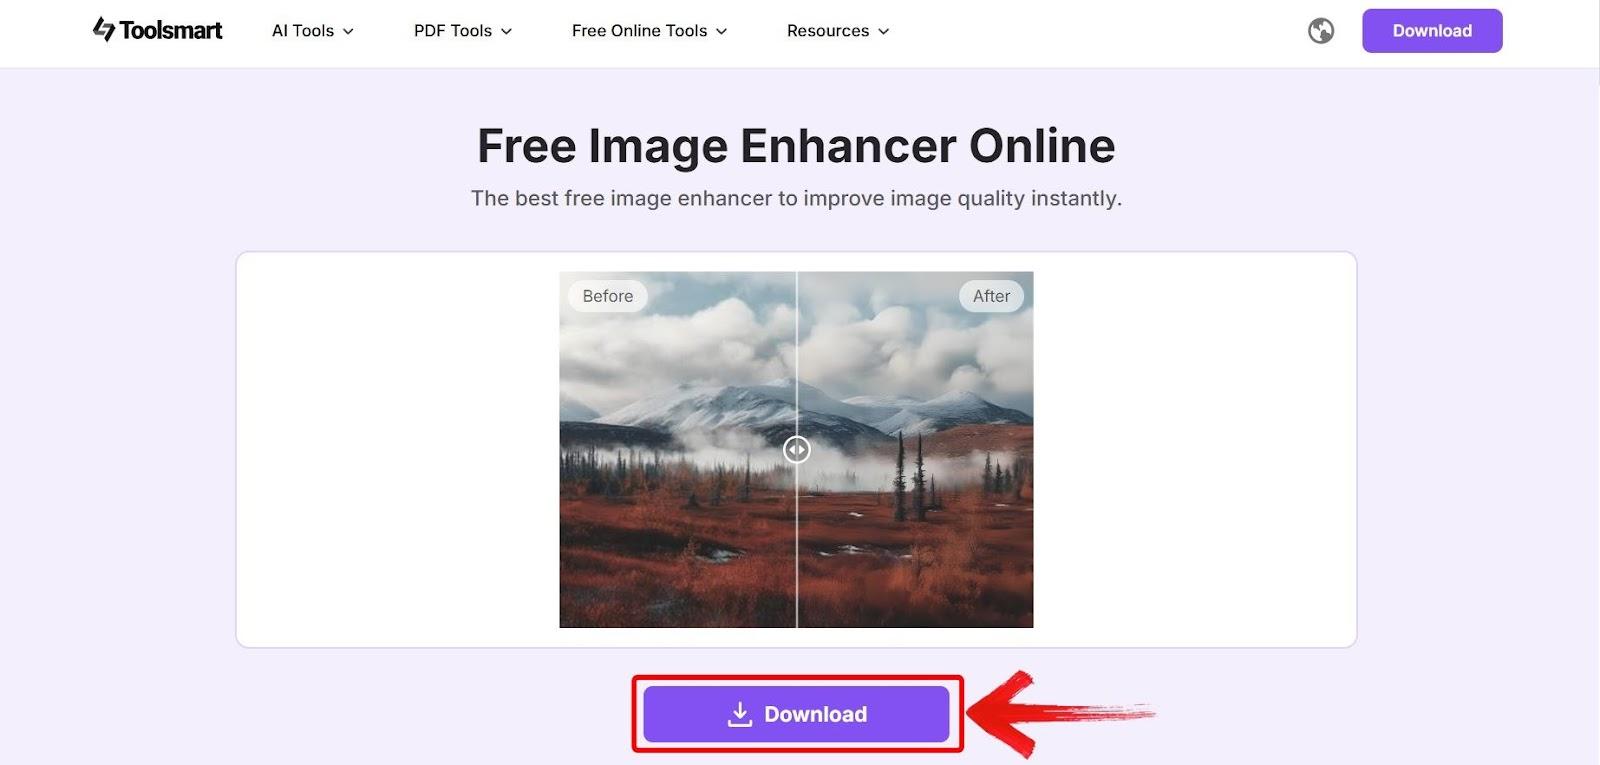
Step 2: After the tool takes some time to enhance your image, preview the clearer version and click on“Download” to save it.
Photoshop vs Toolsmart AI – Which Works Better?
After spending a decent amount of time understanding how to sharpen an image in Photoshop, I started noticing when it was worth going through the full process and when it honestly wasn’t. Photoshop gives you precision and control, but it also takes effort, especially if you're dealing with dozens of images or working on a tight schedule. That’s when I started using Toolsmart alongside it. Not as a replacement, but as a quick alternative for the times I just needed clarity fast. Here’s a side-by-side breakdown of what each one offers, based on how I’ve used them.
| Tool | Ease of Use | Speed of Sharpening | Result Quality | Suitable For |
|---|---|---|---|---|
| Photoshop | Medium–Hard | Moderate | High (if done right) | Designers, photographers |
| Toolsmart AI | Super Easy | Very Fast | Good (especially for blur) | Beginners, casual users |
While Photoshop definitely gives you more control particularly when you're comfortable with its tools, I found myself using Toolsmart more often for everyday fixes. It’s faster, doesn’t require any setup, and still gives solid results for social media posts or casual edits. When I don’t need layers, masks, or fine-tuning, Toolsmart gets it done.
FAQs
1. What is the best tool in Photoshop for sharpening images?
Unsharp Mask is the easiest to use for beginners, while Smart Sharpen gives more control for advanced users.
2. Can sharpening fix a completely blurry photo?
Not entirely. Sharpening can enhance edges but won’t magically restore focus. AI tools like Toolsmart can help more in extreme cases.
3. Will sharpening reduce image quality?
If overdone, yes. You might see halos or noise. The key is moderation or using AI that automatically balances enhancement.
4. Do I need Photoshop to sharpen an image?
No! Tools like Toolsmart AI let you sharpen images in seconds without any software.
5. What format should my photo be in for sharpening?
JPEG and PNG are fine for both Photoshop and Toolsmart. For maximum detail, RAW files work best in Photoshop.
Quick Clarity with Toolsmart
Sharpening photos in Photoshop isn’t just about dragging a slider, it’s about knowing which method actually brings your image back to life without overdoing it. Learning how to sharpen an image in Photoshop gave me more control over portraits and product shots, but it also took time to get comfortable with tools like Unsharp Mask and High Pass. For times when Photoshop felt like too much for a basic edit, I used Toolsmart’s Image Enhancer as a simpler option. It didn’t replace Photoshop, but it sped things up when I needed clean and clear results for older or low-quality photos. I used it to sharpen casual images, prep social media posts, and avoid the headache of manual edits.

