Resizing visuals is something I handle constantly, and I’ve seen how easily quality slips the moment you change dimensions. Many people enlarge a picture only to find it turning soft or pixelated, which can instantly downgrade a solid design. That’s exactly why I put this guide together: to show you how to resize image in Photoshop using practical, reliable methods that hold up in real work. I’ll walk you through clear steps, point out the mistakes most people don’t notice, and help you bring back sharpness when things look off. By the end, you’ll feel more in control of every image you adjust.

3 Methods to Resize Images in Photoshop
Below are three practical and commonly used approaches. Each one solves a different need, so you can pick what fits your workflow.
1. Using the Image Size Tool
Before diving into the steps, I want to point out that this tool gives you the most exact control. If you need specific width, height, or resolution values, this is the method I always rely on.
Step 1: First of all, open your image in Photoshop.
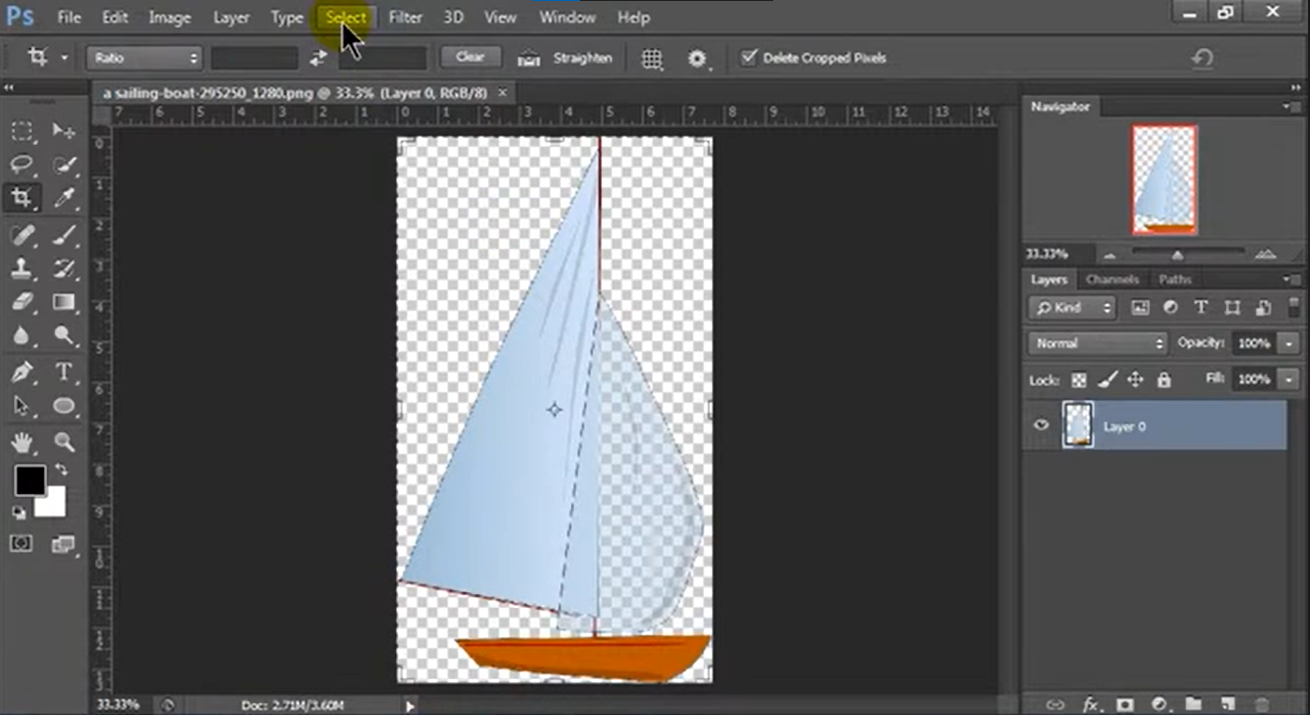
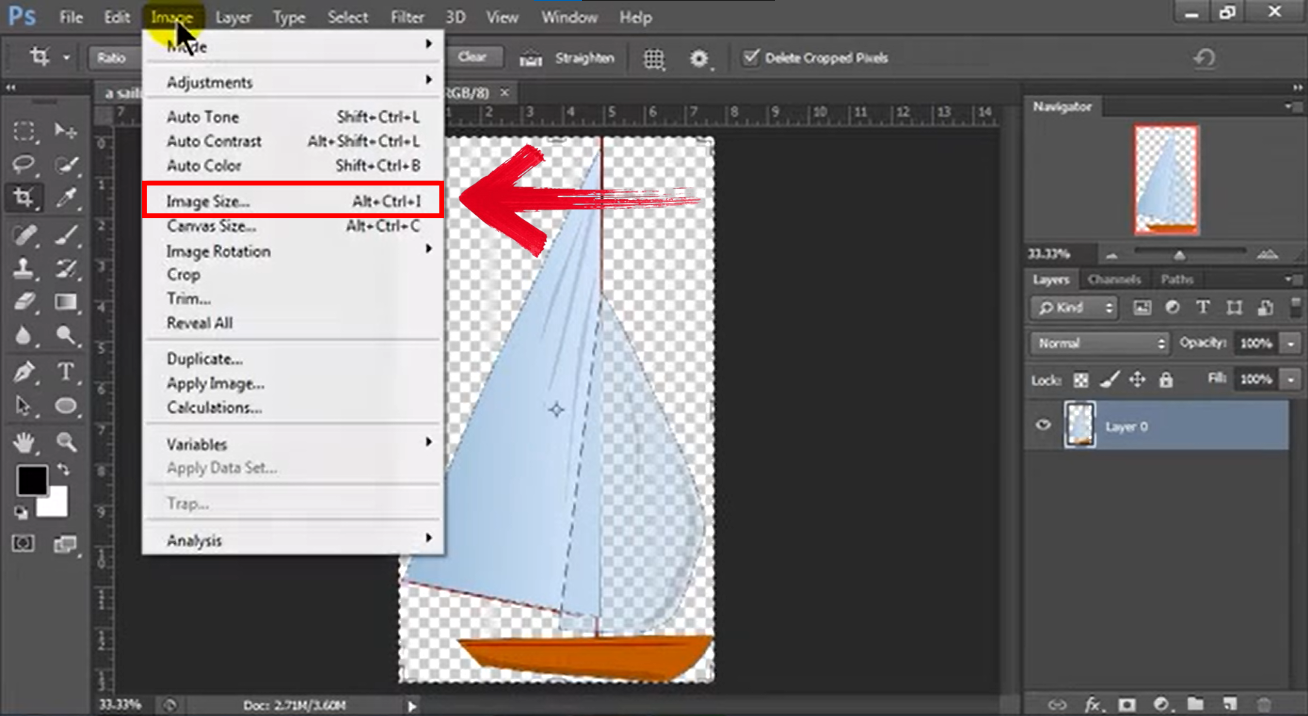
Step 2: Go to “Image” from the panel above your screen and click “Image size.”
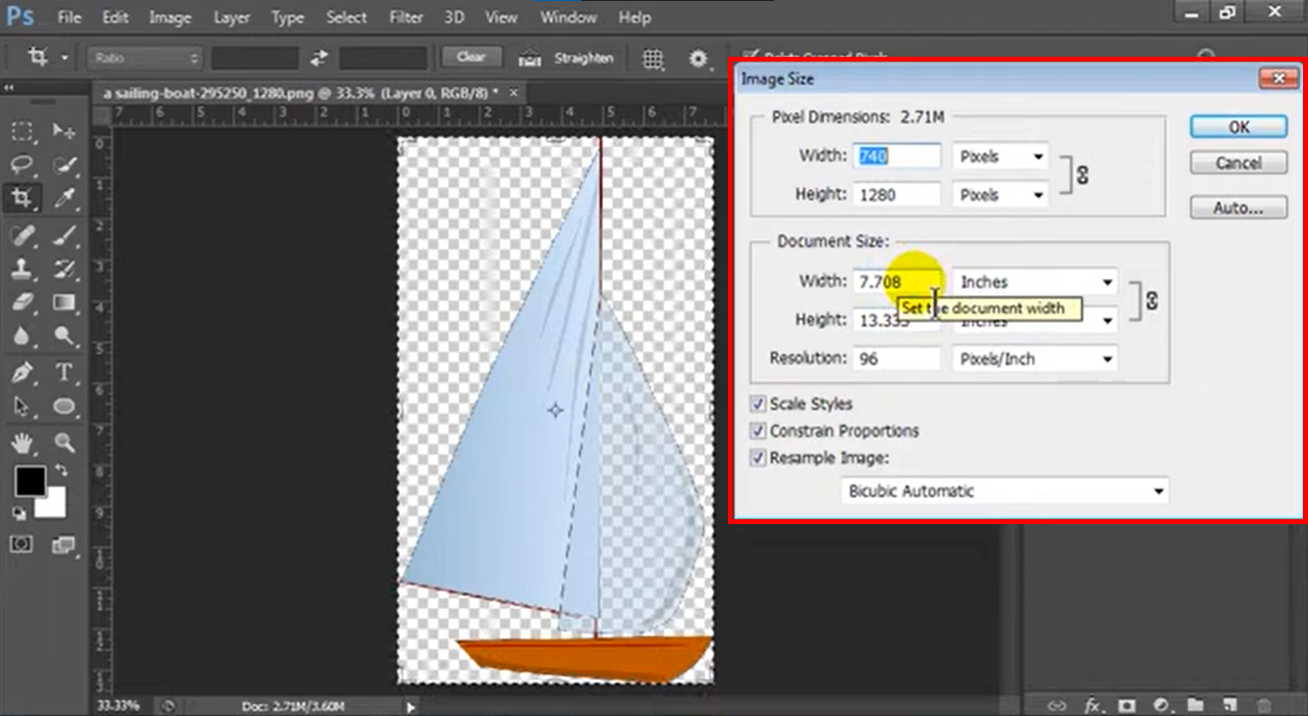
Step 3: Enter new dimensions and resolution and set them according to your preference.
Pros:
You get complete numerical control, which helps you match precise photoshop imagedimensions for printing or professional layouts.
It lets you change picture size without guessing or eyeballing the scale.
You can preview how the image will react before you finalize.
Cons:
Enlarging too much can soften the image, especially if the original is low‑resolution.
You might need additional sharpening afterward to maintain crisp detail.
High-resolution outputs sometimes make the file heavier.
Whenever I need reliable output for clients or print-based projects, this tool remains the most accurate. It keeps everything predictable, especially when dealing with exact measurements.
2. Using Free Transform
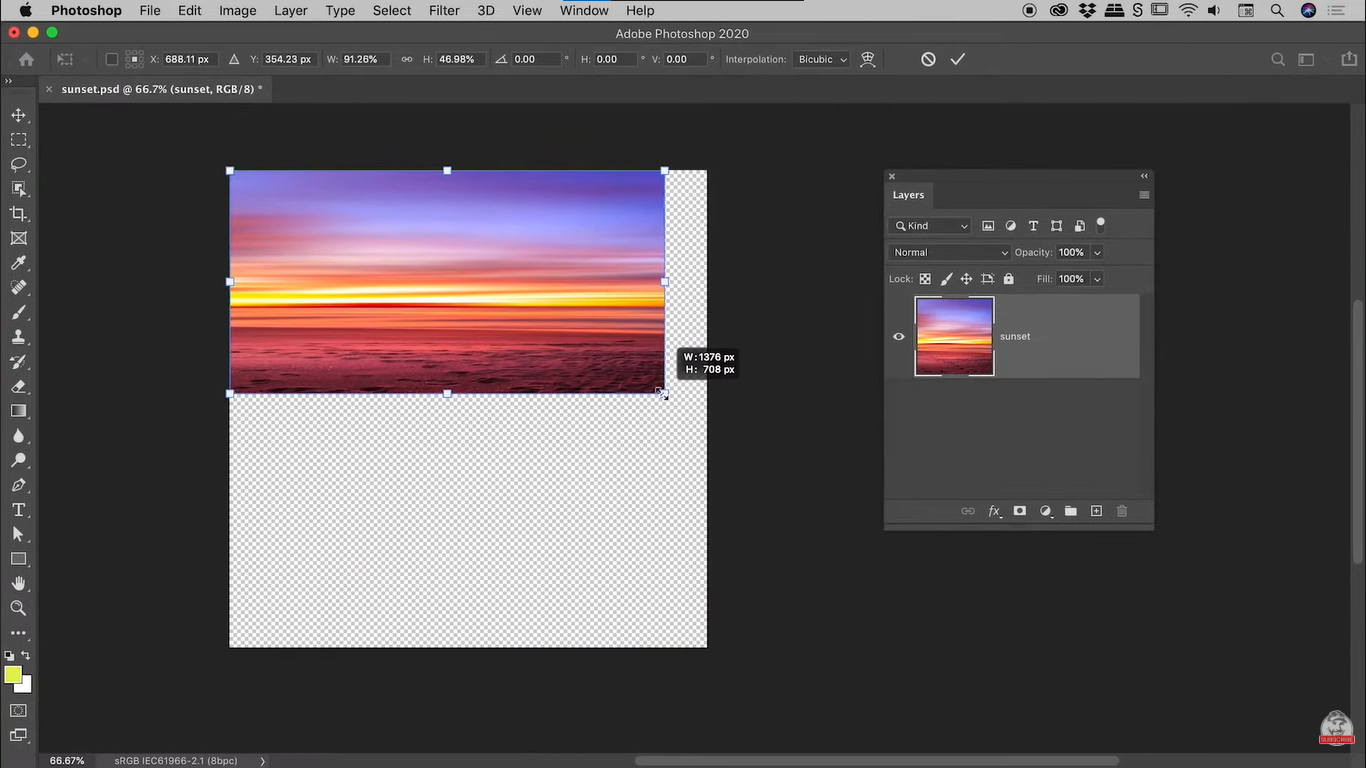
Sometimes you just want to scale an image quickly without diving into numbers. Free Transform makes resizing intuitive, and you can see changes in real time.
Step 1: First of all, Select the image layer and press “Ctrl+T” (Windows) / “Cmd+T”(Mac) to activate transformation.
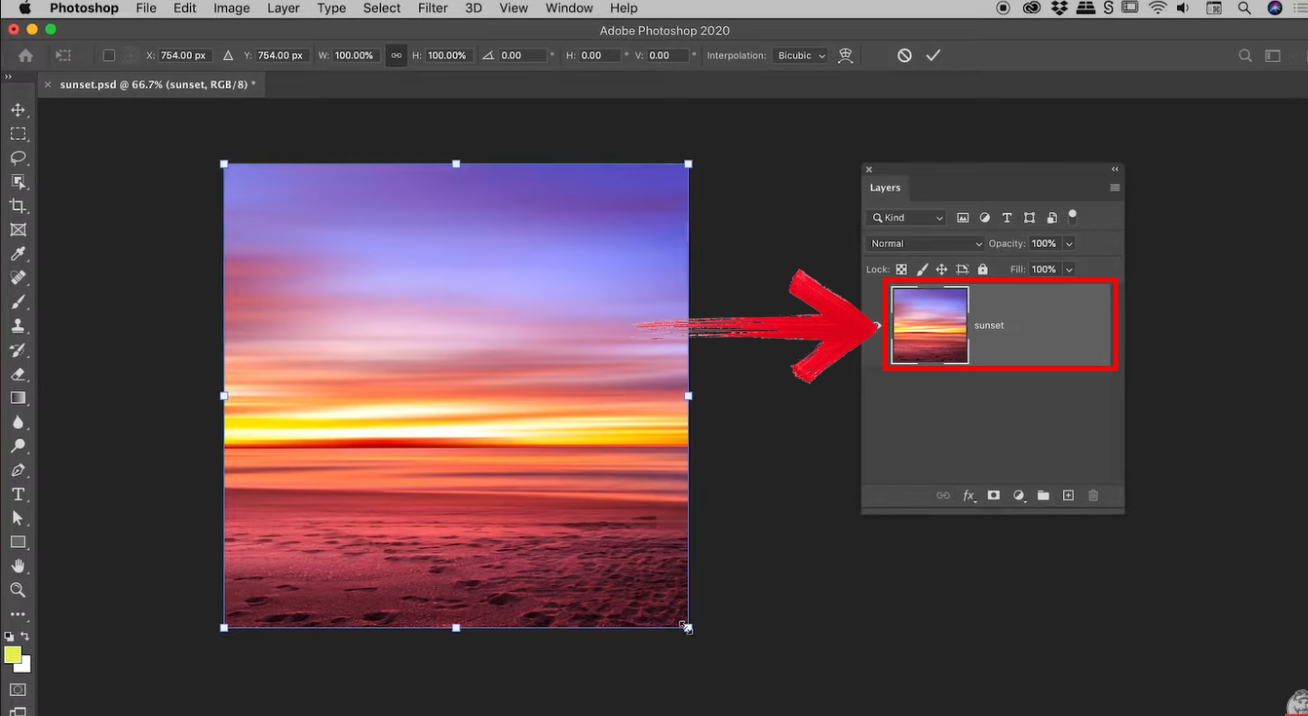
Step 2: Drag corners while holding Shift to maintain proportions.
Pros:
This method feels natural and quick, especially for basic photoshop scale image tasks.
It is great when you want direct visual control instead of typing values.
You can adjust the image inside a larger composition without affecting other layers.
Cons:
If you pull too far, the image may turn blurry instantly.
Distortion happens easily when you forget to hold Shift.
It lacks precision compared to the Image Size tool.
I use this when I’m laying out graphics or making social media designs. It speeds up the workflow, and the live preview helps me adjust details faster.
3. Using the Crop Tool with Resize
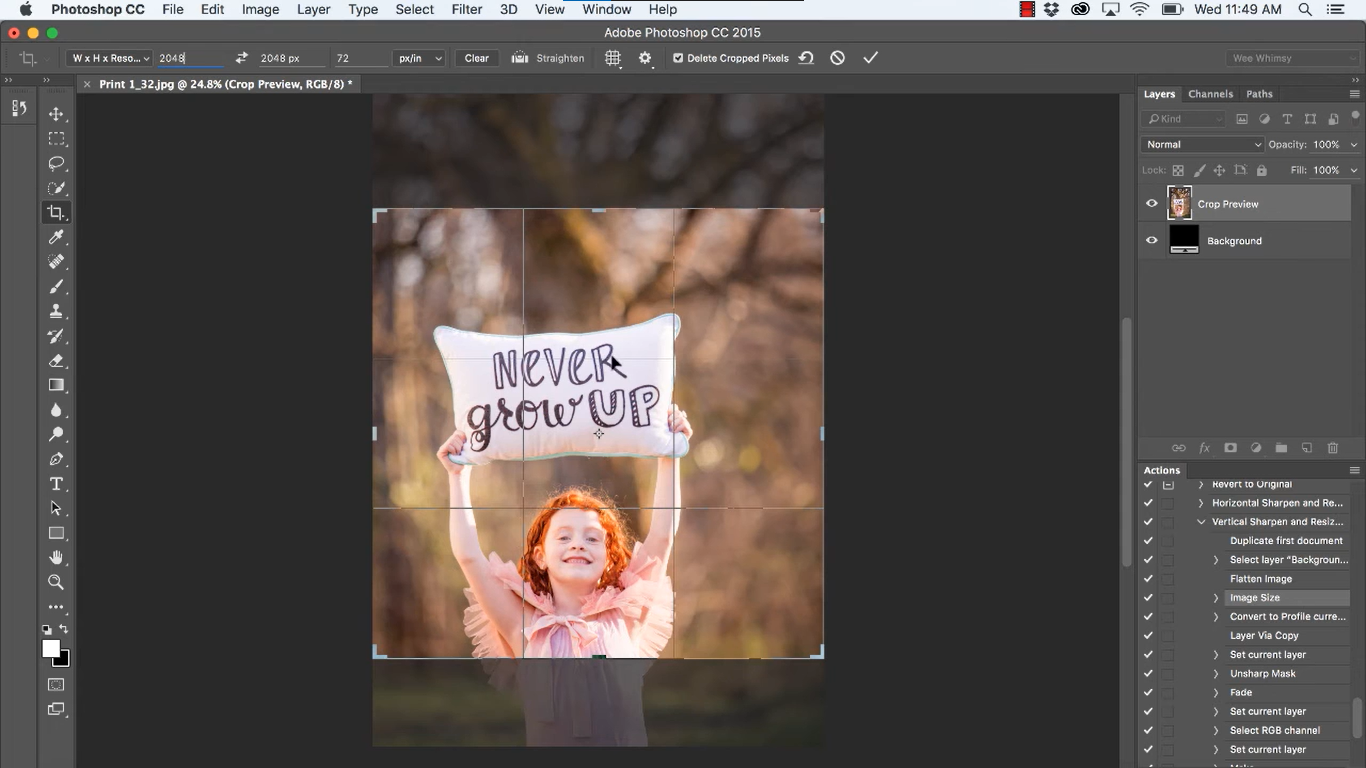
This method works well when you want to resize along with a bit of cropping. I use it when I need specific framing plus new dimensions, especially when I need to adjust photo resolution photoshop without complicating the workflow.
Step 1: First of all, select the Crop Tool.
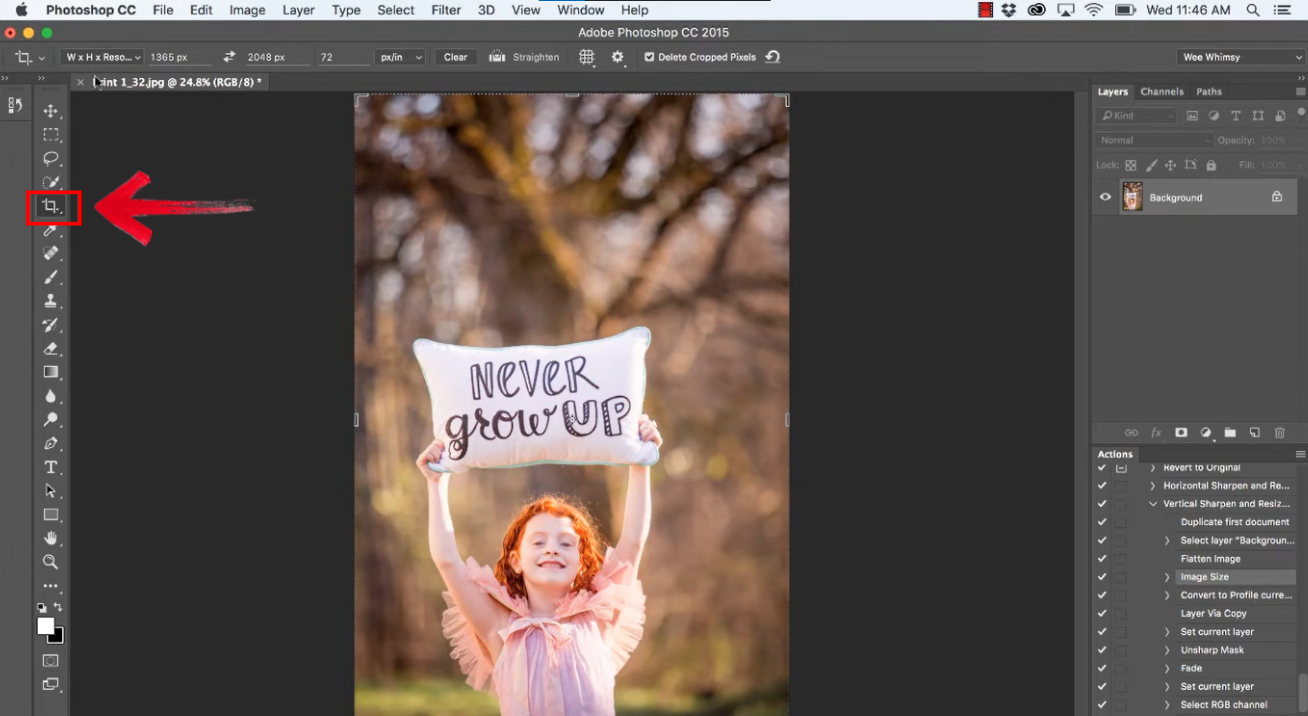
Step 2: Now simply adjust crop boundaries using the corners.
Pros:
You can resize photo Photoshop style while controlling composition at the same time.
It’s useful when preparing thumbnails or social banners.
Lets you set resolution alongside cropping, which keeps your file organized.
Cons:
Not ideal when you want dimension-only adjustments.
Misaligned boundaries can cut off important elements.
The preview might look slightly misleading until you apply the crop.
Whenever I’m preparing images for web banners, I like using this method because it helps me control both size and framing at once.
Common Problems After Resizing
Once you understand how to resize image in Photoshop, you’ll notice that your final result sometimes drops in quality. Even small changes can soften edges or reduce detail, especially if the original file wasn’t very sharp. Low-resolution images react the most, and enlargingthem often exposes hidden flaws. I’ve also seen quality drop when an image goes through multiple edits in one session. These small issues stack up and make the final output look less crisp than expected. Here are the most common mistakes:
Blurry images after enlarging:
When you push dimensions too far, Photoshophas to invent pixels, which softens edges.
Pixelation in low-resolution photos:
Pictures from phones, screenshots, or old devices often break apart when scaled.
Loss of sharpness when exporting:
Compression for web or print can reduce clarity.
These problems directly affect your final look, and I’ve seen many projects lose their impact because of small quality drops. Over the years, I’ve handled countless client files that became blurry after resizing. These issues happen to almost everyone, even professionals, so don’t feel discouraged.
Fix Blurry Images with Toolsmart Image Enhancer
Before getting into the features, let me introduce how this tool fits into your workflow. After resizing in Photoshop, I often run the image through this enhancer to restore crispness. It doesn’t just sharpen; it rebuilds clarity that gets lost when you enlarge a file. The tool works directly in the browser, and I’ve found it extremely fast for everyday use. Toolsmart’s Image Enhancer is an AI-powered clarity booster designed specifically for images affected by resizing.

I’ve used it to touch up low-resolution pictures, bring back detail in old photographs, and make social media graphics stand out. The tool focuses on improving real edges rather than artificially oversharpening, which keeps the look natural. It processes images instantly, making it easy to slot into your normal Photoshop workflow. You just upload the picture, let the tool enhance it, and download a much sharper version.
How It Helps:
It sharpens edges and restores detail that often gets lost during resizing.
It removes pixelation from images that start out small or low-quality.
It enhances both textand photos without making them look artificial.
Pros:
It works online, which removes installation hurdles.
It cleans up blurry, enlarged pictures quickly.
It supports various image types, making it flexible for different projects.
Cons:
Internet speed affects processing time.
Very large files may take a moment to upload.
Overly damaged images still require some manual editing.
I often run resized images through this tool, especially for web visuals. It consistently gives me cleaner results without forcing extra Photoshop adjustments.
FAQs
Q1: Can I resize without losing quality in Photoshop?
Small reductions usually maintain quality, but enlargements lose detail. An external enhancer can help restore lost sharpness.
Q2: What resolution should I use for web vs print?
For web, 72 PPI works well. For print, 300 PPI keeps your output crisp.
Q3: My output looks blurry after export. What can I do?
Try rechecking export settings and then enhance it using a clarity-restoring tool.
Q4: Does the enhancer work only for photos?
No, it works for illustrations, text, and graphics.
Q5: Is the Image Enhancer free to use?
Yes, it runs fully online without login.
Final Thoughts on Resizing Images in Photoshop
In this guide, I explained how to resize image in Photoshop using the Image Size Tool, Free Transform, and Crop Tool, each helping you handle a different kind of resizing need. These methods make the process easier, but the quality drop that follows enlargement is still something many people run into. That’s where a clarity-restoring tool becomes a strong addition to your workflow. Instead of re-editing or sharpening manually, you can enhance the final image with a cleaner, more efficient approach using Toolsmart’s Image Enhancer. It creates a smoother production process overall, especially when you’re preparing visuals for web, print, or design projects.

