Color inversion in Photoshop can be a game-changer for your designs and photos. Photoshop makes it possible through simple shortcuts to advanced layer adjustments. However, as someone who’s worked with this tool, I know it can be tricky for beginners. Inverted images can sometimes look dull or unclear, which often requires extra adjustments. In this guide, I'll share the easiest and most effective ways on how to invert colors in Photoshop and tips to enhance image quality afterward.

Why Invert Colors in Photoshop?
Inverting colors in Photoshopisn’t just about creating a negative image. It has practical uses across various industries:
Creating negative-style visuals for artistic effect: Perfect for creating abstract or high-contrast visuals.
Enhancing contrast and isolating subjects: Helps bring out elements in a design or photo that might otherwise blend into the background.
Designing T-shirt prints or bold digital artwork: Great for preparing graphics for merchandise.
Supporting vision accessibility needs: Inverting colors can make content more readable for users with specific visual impairments.
How to Invert Colors in Photoshop
Now that we understand the benefits of inverting colors, let's look into how to Invert Colors in Photoshop. In this section, I’ll walk you through the simplest and most effective ways to invert colorsin Photoshop, whether you prefer using shortcuts, adjustments, or even inverting specific areas of your image.
Method 1: Inverting Colors Using Adjustments
In the first method, we will be looking into how to invert colors in Photoshop layer. This might be the longest, however it's good to know how to invert colors in Photoshop this way as well.
Step 1: Open Photoshop and go to"File", then click "Open". Select your image, and it will appear in the workspace.

Step 2: Next, navigate to "Layer"then “New Adjustment Layer” and finally click"Invert". You can name the layer if you like.
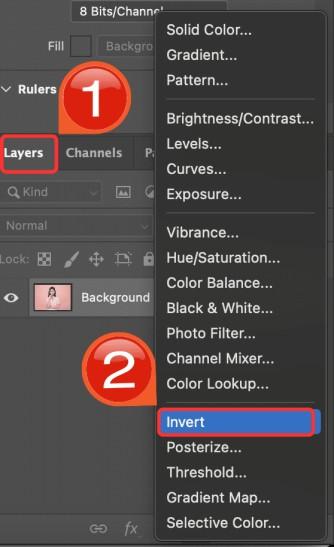
Step 3: Then, click “OK”. This will add an “Invert Adjustment Layer” above your image, instantly flipping the colors

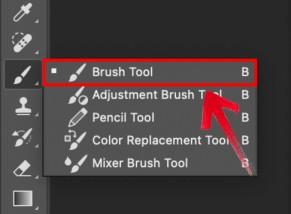
Step 4: Now, click on the “Invert Adjustment Layer” in the Layers panel. Use the brush tool to paint over the area you want to invert, and the selected part will be transformed.
Method 2: Inverting Colors Using Keyboard Shortcut
If you're looking for a quicker way on how to invert colors in Photoshop, the Photoshop shortcut to invert colors is your best friend. It’s super fast and easy, perfect for when you need to make changes on the fly without going through menus. Let’s take a look at how it works.
Step 1: Open Photoshop and go to"File", then click "Open". Select your image, and it will appear in the workspace.
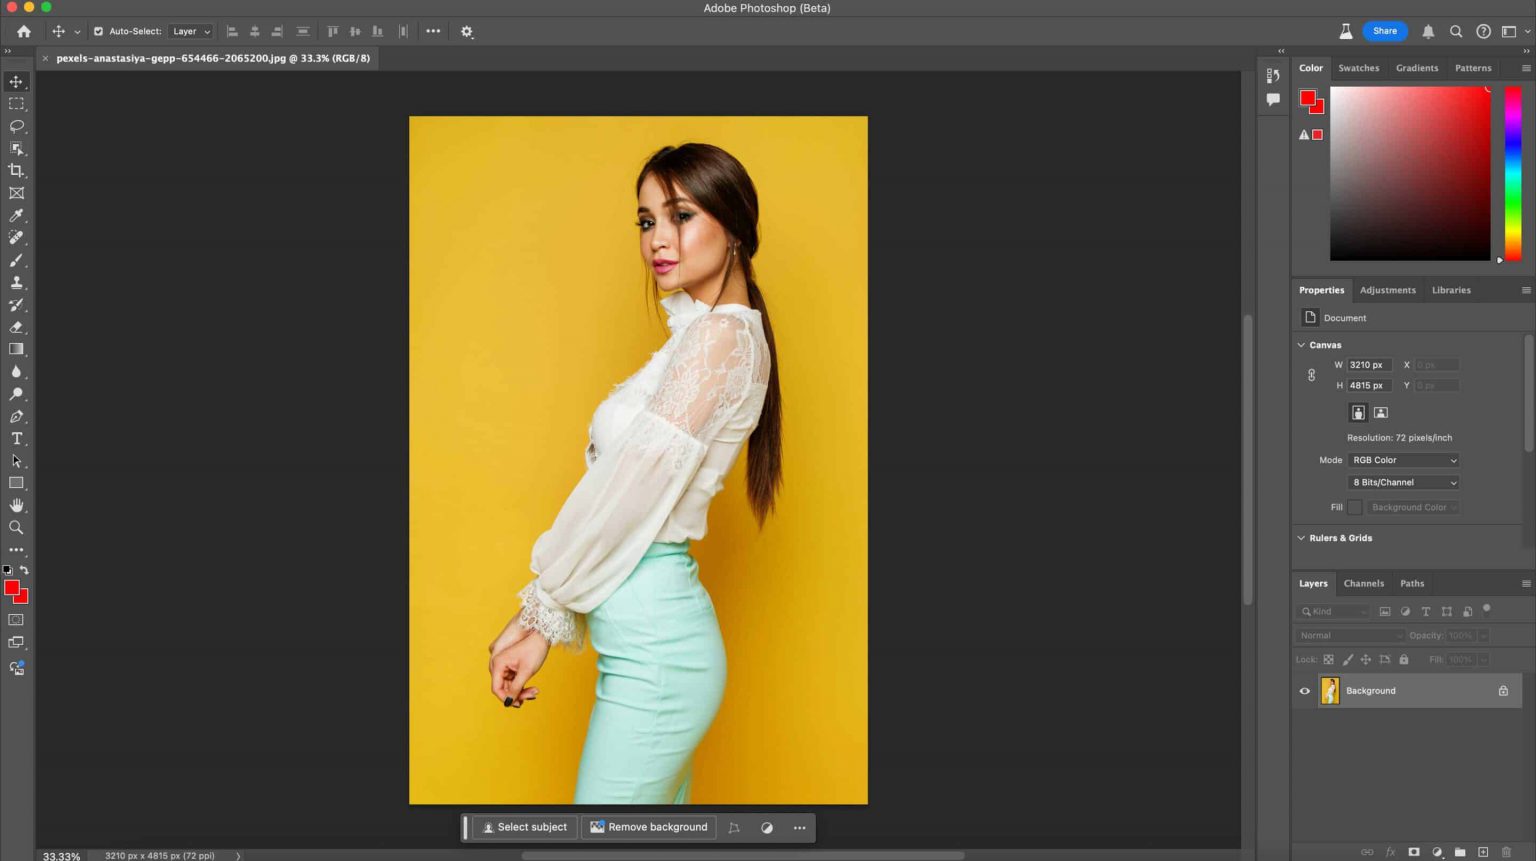
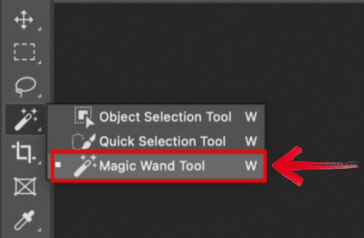
Step 2: Use the “Magic Wand tool”to click on the object in your image that you want to invert. Make sure it’s highlighted and active.
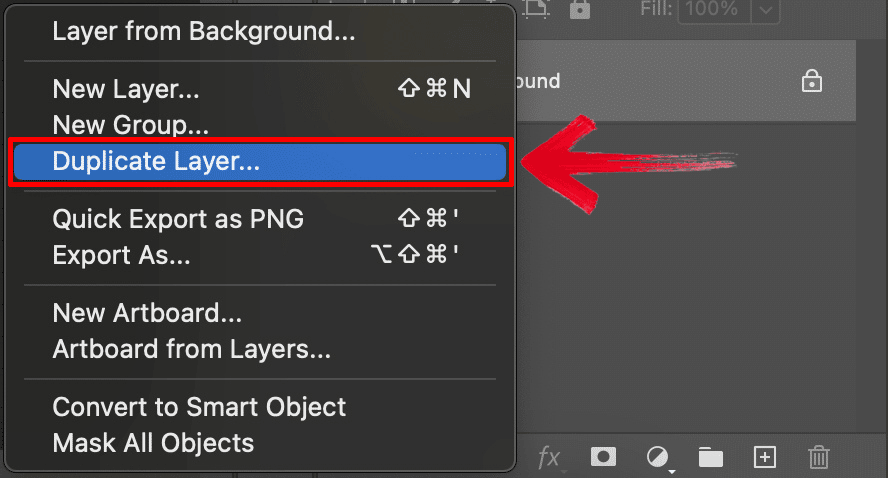
Step 3: Right-click on the layer and select"Duplicate Layer" to create a copy of the selected area.
Step 4: Now, press “Ctrl + I”(Windows) or “Cmd + I” (Mac) to quickly invert the colors of the selected layer.
Step 5: Now, click on the “Invert Adjustment Layer” in the Layers panel. Use the brush tool to paint over the area you want to invert, and the selected part will be transformed.

Step 6: Make any additional changes if not; this is how your picture should look after the changes.

Method 3: Inverting Specific Areas
Sometimes, you only want to invert a certain part of your image rather than the whole thing. This method allows you to target specific areas for inversion, giving you more control over your edits. Let’s see how it’s done.
Step 1: Open Photoshop and go to"File", then click "Open". Select your image, and it will appear in the workspace.
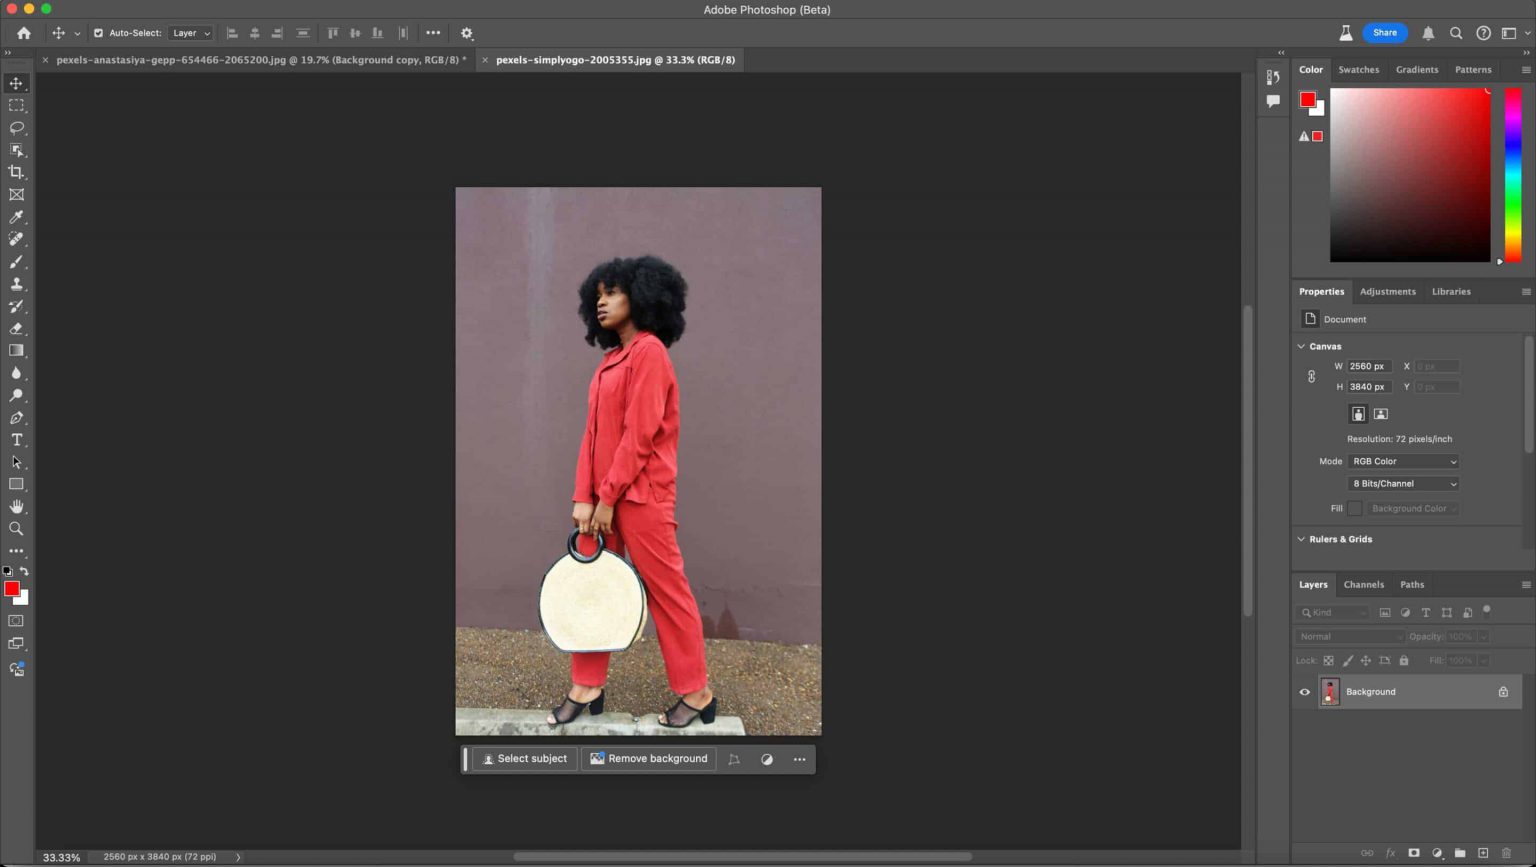
Step 2: Select the area you want to invert using a tool like the Marquee, Lasso, or Magic Wand.

Step 3: With the area selected, press “Ctrl + I” (Windows) or “Cmd + I” (Mac) to invert the colors only in the highlighted section.
Step 4: Make any additional changes if not; this is how your picture should look after the changes.

If you’re working on your phone, then you can Invert colors in Photoshop Express, which is the phone version of Photoshop that is specifically made for mobile phones, and it is faster and more streamlined.
Bonus Tool – Toolsmart Free Image Enhancer
Now that we have learned how to invert colors in Photoshop, I’ve noticed that sometimes the image can lose a bit of its clarity or appear a little washed out. I’ve run into this issue myself, especially when working with complex designsor detailed photos. I remember spending a lot of time trying to fix the dullness in my images, using various tweaks and adjustments.

That’s when I stumbled upon Toolsmart Free Image Enhancer, which completely changed the way I approached post-inversion editing, an AI-poweredimage enhancer that helped me restore vibrancy and sharpness in no time.
Toolsmart Free Image Enhancer is a free AI-powered tool designed to boost the clarity and sharpness of your images, making them look vibrant and crisp. It’s an easy-to-use, web-based tool that doesn’t require any sign-up, allowing you to quickly enhance your images right in your browser.
Features:
AI-Powered Technology: Uses advanced AI algorithms to automatically enhance image clarity and detail.
No Signup Required: You can start enhancing your images immediately, without needing to create an account.
Free to Use: Completely free with no hidden fees, making it accessible for everyone.
Browser-Based: Works directly in your browser, so there’s no need to download or install any software.
Quick Processing: Enhances images in just a few seconds, providing fast results.
Pros:
No login required
Boosts resolution and sharpness
Completely free
Works directly in your browser
How to Use Toolsmart Free Image Enhancer
Using Toolsmart’s Image Enhancer is incredibly straightforward, even if you’re not a tech expert. I always appreciate tools that get straight to the point without unnecessary complications, and this one fits the bill perfectly. Here’s how you can quickly enhanceyour AI-generated character images in just a few simple steps:
Step 1: Head on over to the Toolsmart Free Image Enhancer website.

Step 2: Click on the “Upload image”option or drag your image directly onto the screen

Step 3: Once you’re done, click“Download” to save it to your device.
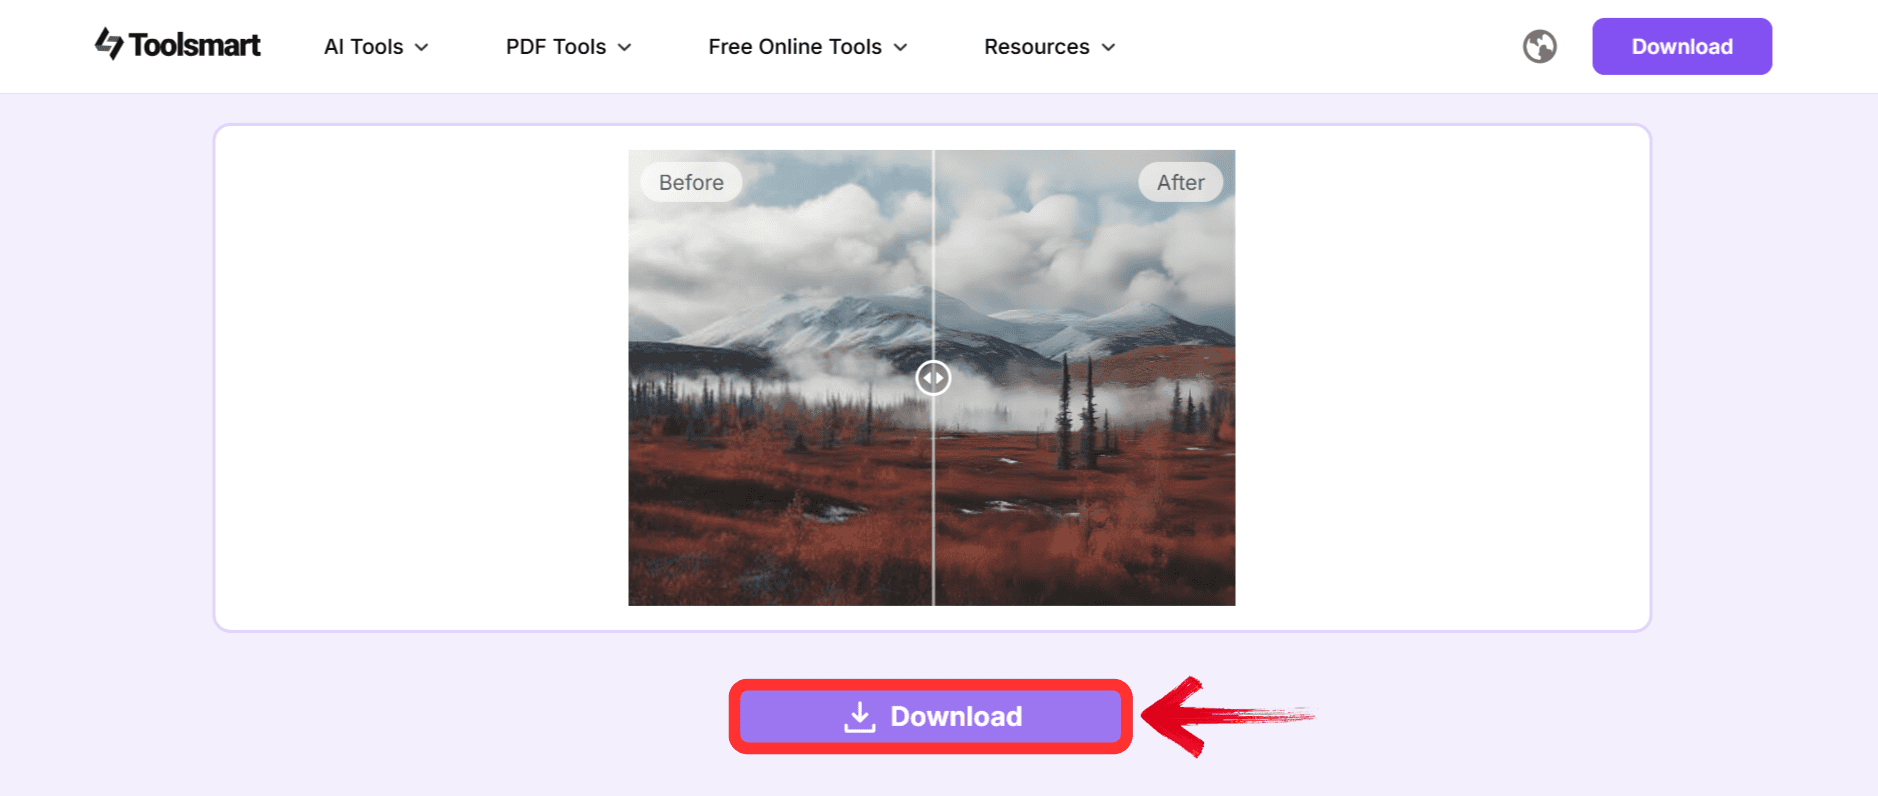
It’s that simple. I appreciate how streamlined the whole process is; no complicated menus or hidden fees, just clean, high-quality results fast.
FAQs
Q1: Can I invert only one color channel in Photoshop?
Absolutely! If you want to get creative, you can go to theChannels panel and invert the red, green, or blue channel separately. This allows you to play around with unique color effects.
Q2: Will inverting colors reduce image quality?
Inverting the colors itself doesn’t affect image quality, but sometimes it can make things look a bit flat or washed out. That’s why tools like the Toolsmart Free Image Enhancer can come in handy to bring the vibrancy back!
Q3: Do I need to rasterize the layer first?
Only if your layer is a smart object or text. Otherwise, you can go ahead and invert the colors directly without needing to rasterize it.
Q4: Is Toolsmart safe to use?
Yes, it’s completely safe! It runs entirely in your browser and doesn’t store your images, so you don’t have to worry about your data being saved anywhere.
Mastering Color Inversion in Photoshop: Techniques and Tips for Vibrant Results
We’ve covered the different ways on how to invert colors in Photoshop, from simple shortcuts to advanced layer adjustments. Additionally, we introduced Toolsmart Free Image Enhancer, a handy tool for improving image quality after color inversion. With these techniques, you can easilyinvert colors in Photoshop and create stunning visuals while ensuring your images maintain their vibrancy and clarity.

