Photoshop is the most advanced and popular graphic design tool, but even for professionals, the most basic tasks can become complex. While blending two photos in Photoshop is a fundamental skill, it's normal for anyone to relearn it because of Photoshop's complex interface. This guide provides a step-by-step tutorial on how to blend two images in Photoshop, ensuring you achieve professional-looking results every time.

4 Methods to Blend Two Images in Photoshop
If you want to master how to blend photos in Photoshop, you need to know the four core methods. Each one is ideal for a different type of project, from detailed portrait composites to quick landscape overlays. Below, I’ve put together 4 of the best methods to blend photos in Photoshop. Here’s how to blend two images in Photoshop:
Using Layer Masks
LayerMasks offer the most creative control and precision, making them the industry standard for detailed work. This method is non-destructive, meaning you can always adjust your blending later without altering the original images.
Steps:
Layer Masks can look intimidating at first, but the process is actually very straightforward. Here’s the simplest way to get started:
Step 1: Open both images in Photoshop and ensure they are on separate layers within the document.
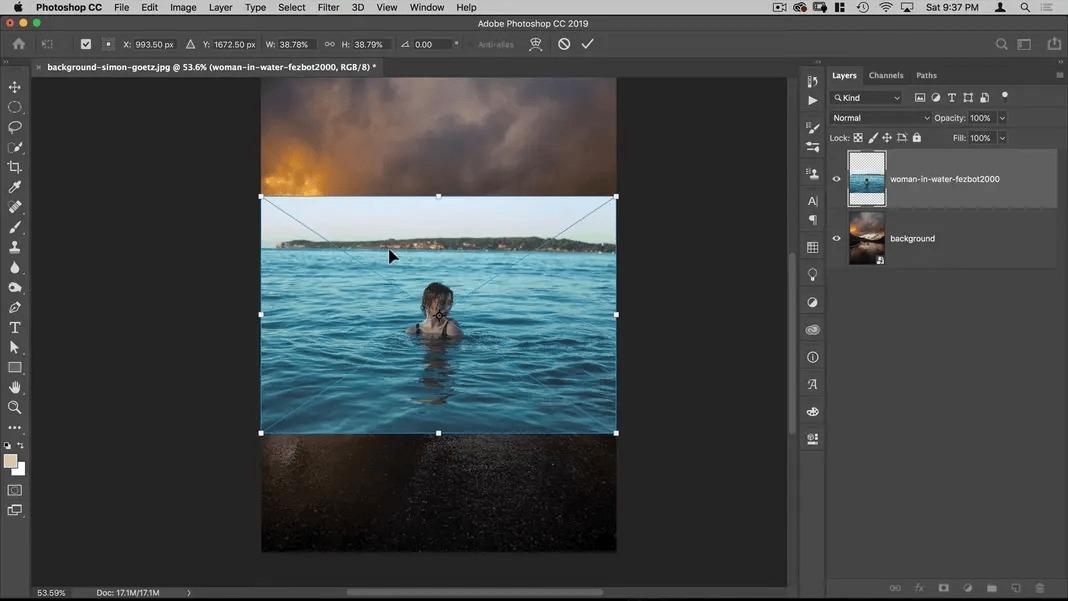
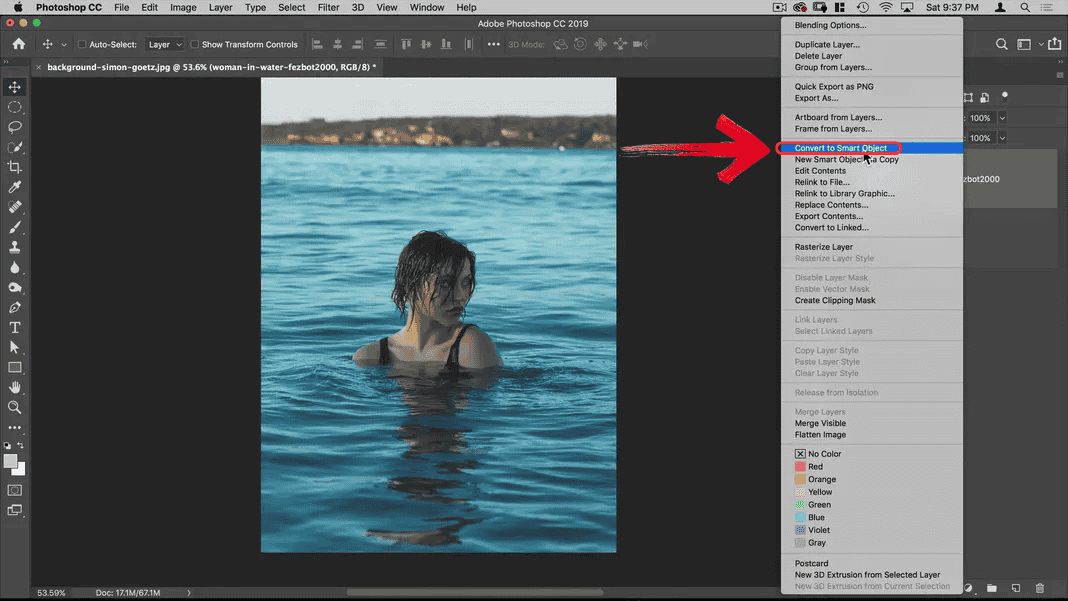
Step 2: Then right-click the layer containing the layer you want on top and click “Convert to a Smart Object”.
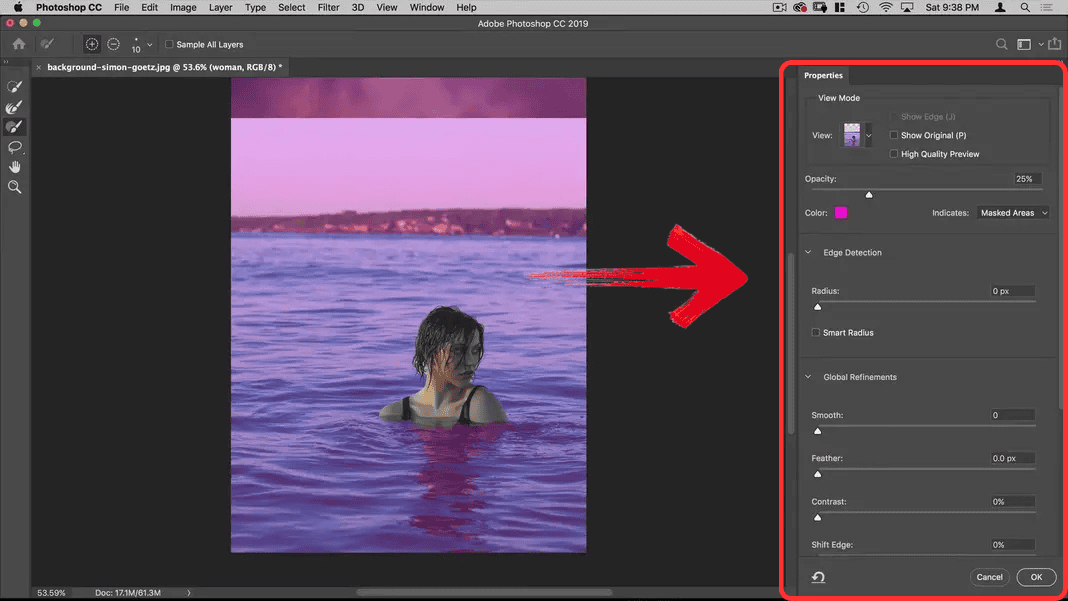
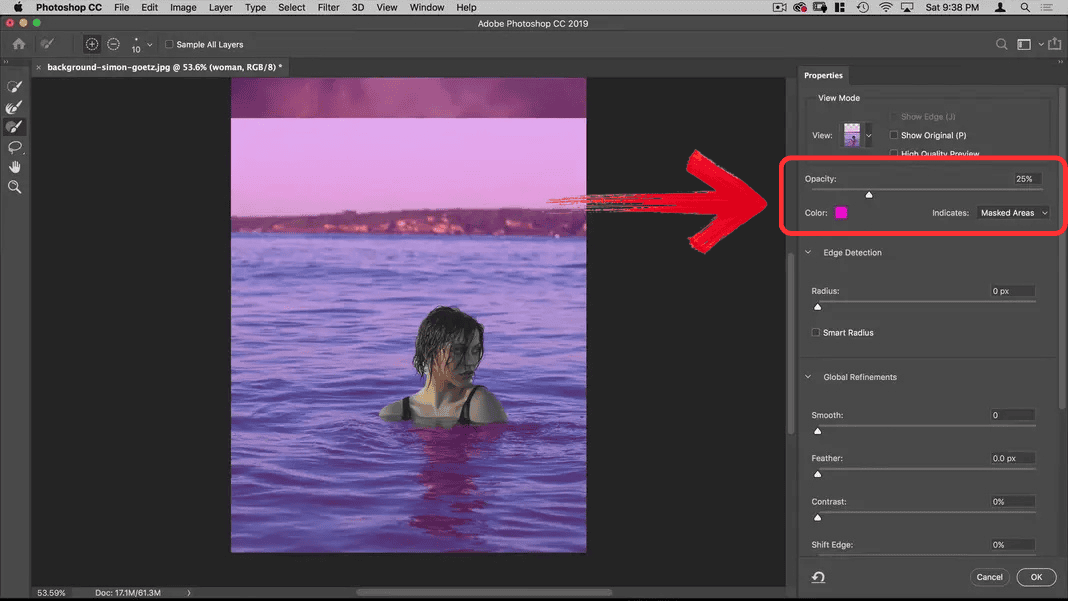
Step 3: Select the top layer and click the “Select and Mask” at the bottom of the Layers panel.
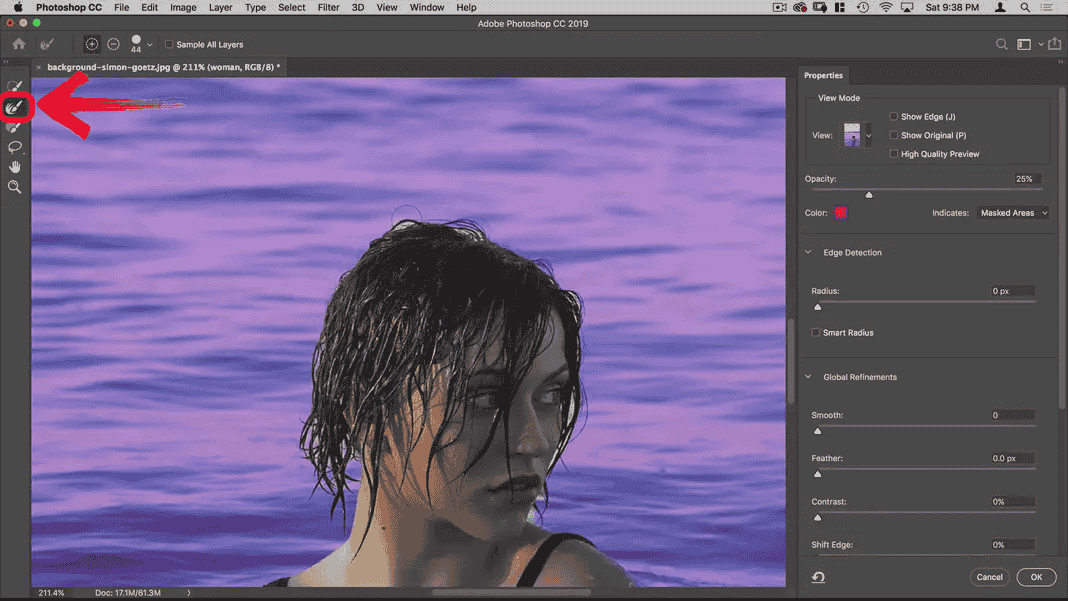
Step 4: Select the Refine Edge brush and paint around the edge of the subject you want to blend out or erase.
Step 5: For smoother transitions, go to the Layers panel and adjust the layer opacity of the mask until the blend looks natural.
Pros:
Completely non-destructive, so you can adjust or undo your blending at any time.
Highly customizable, giving you full control over how the two images merge.
Perfect for detailed composites and portrait work, where precision really matters
Cons:
Requires practice and a steady hand for seamless transitions.
Blend Modes
If you're a beginner or just need a quick creative spark, Blend Modes are the easiest place to start. This technique instantly changes how the pixels of your top layer interact with the pixels below it. It's perfect for creating dramatic lighting effects or double exposures without needing any complex brushwork.
Steps:
If you want a blend that takes seconds instead of minutes, here’s how to get it done using Blend Modes:
Step 1: Place both images on separate layers.
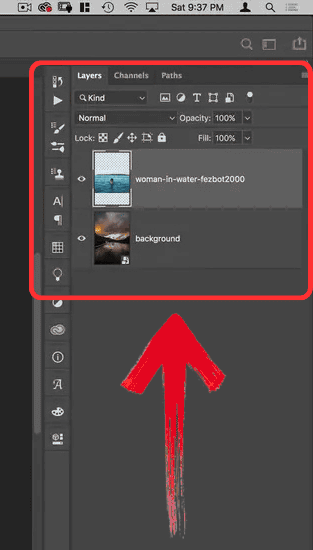
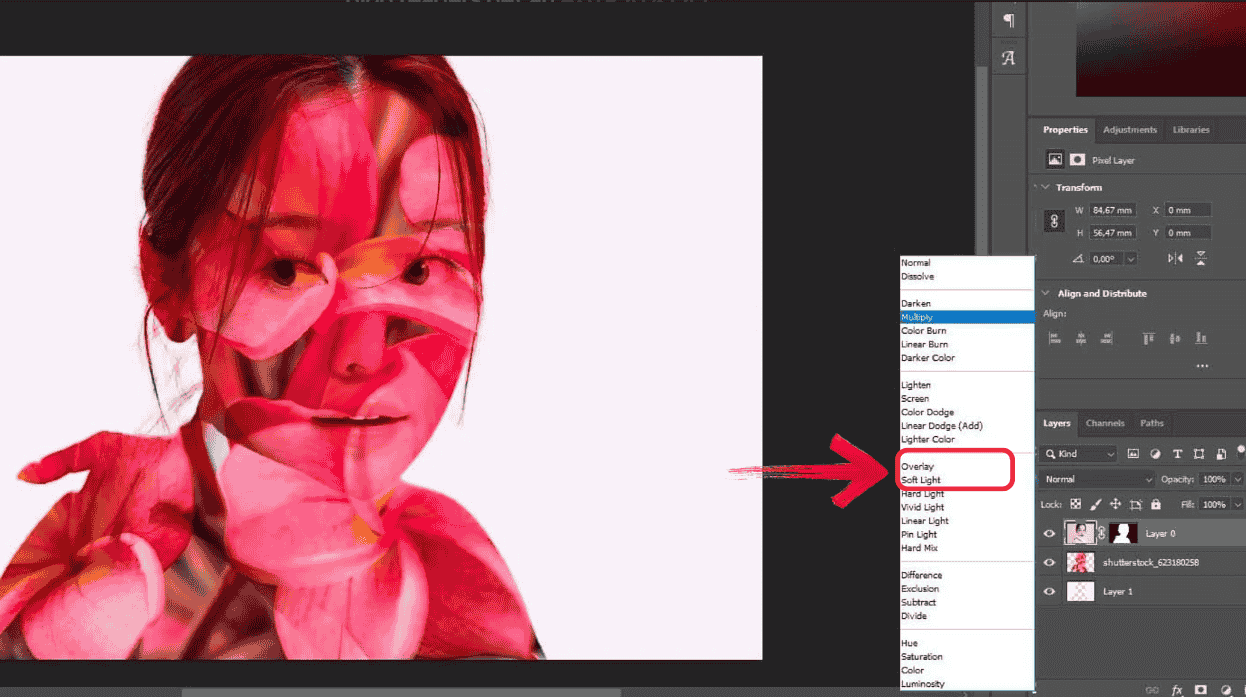
Step 2: Select the top layer and look at the Layers panel's dropdown menu. Experiment with different blend modes (like Overlay or Soft Light).
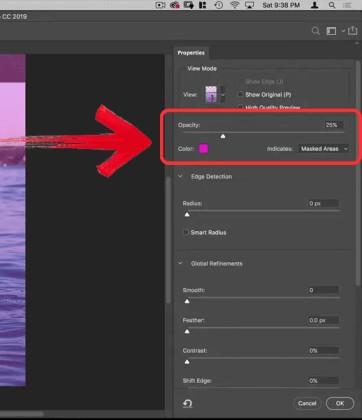
Step 3: Use the layer opacity slider to fine-tune the overall strength of the blending effect.
Pros:
Quick and efficient, providing instant creative results with minimal effort.
You can cycle through every blend mode using your keyboard shortcuts, allowing you to accidentally discover amazing artistic combinations you hadn't planned.
Cons:
Offers limited control over specific areas, as the effect is applied globally across the entire layer.
Gradient Tool for Blending
The Gradient Tool is fantastic for creating natural, smooth transitions, especially across large areas like skies or horizons. It achieves a perfect transition line that is hard to replicate manually with a brush. When you need a perfectly smooth transition blending a new sky into a landscape horizon, the Gradient Tool is fantastic.
Steps:
This method relies on a simple drag of your mouse, but the setup ensures your transition comes out smooth and natural. Once everything is in place, the gradient will do most of the work for you.
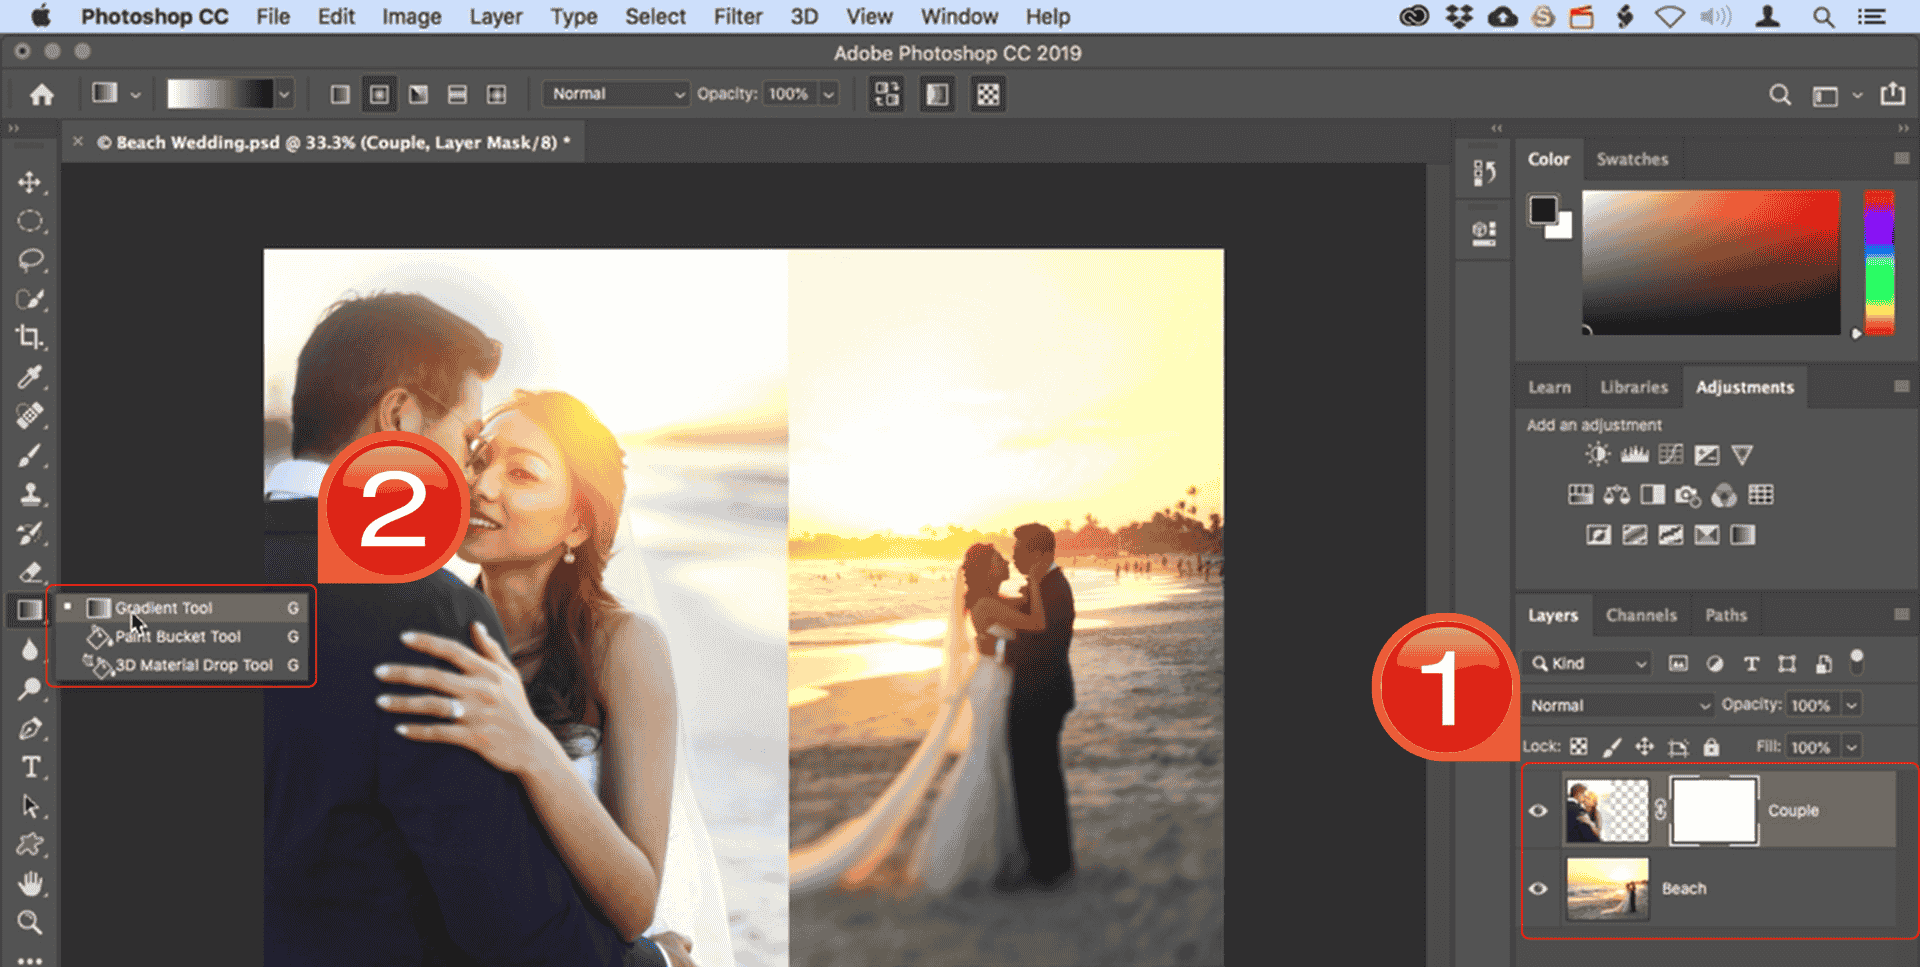
Step 1: Go to the Layers panel and add a layer mask to attach a new mask to your active layer. Next, find the right tool for the job. Select the “Gradient tool” from the main Toolbar on the left.
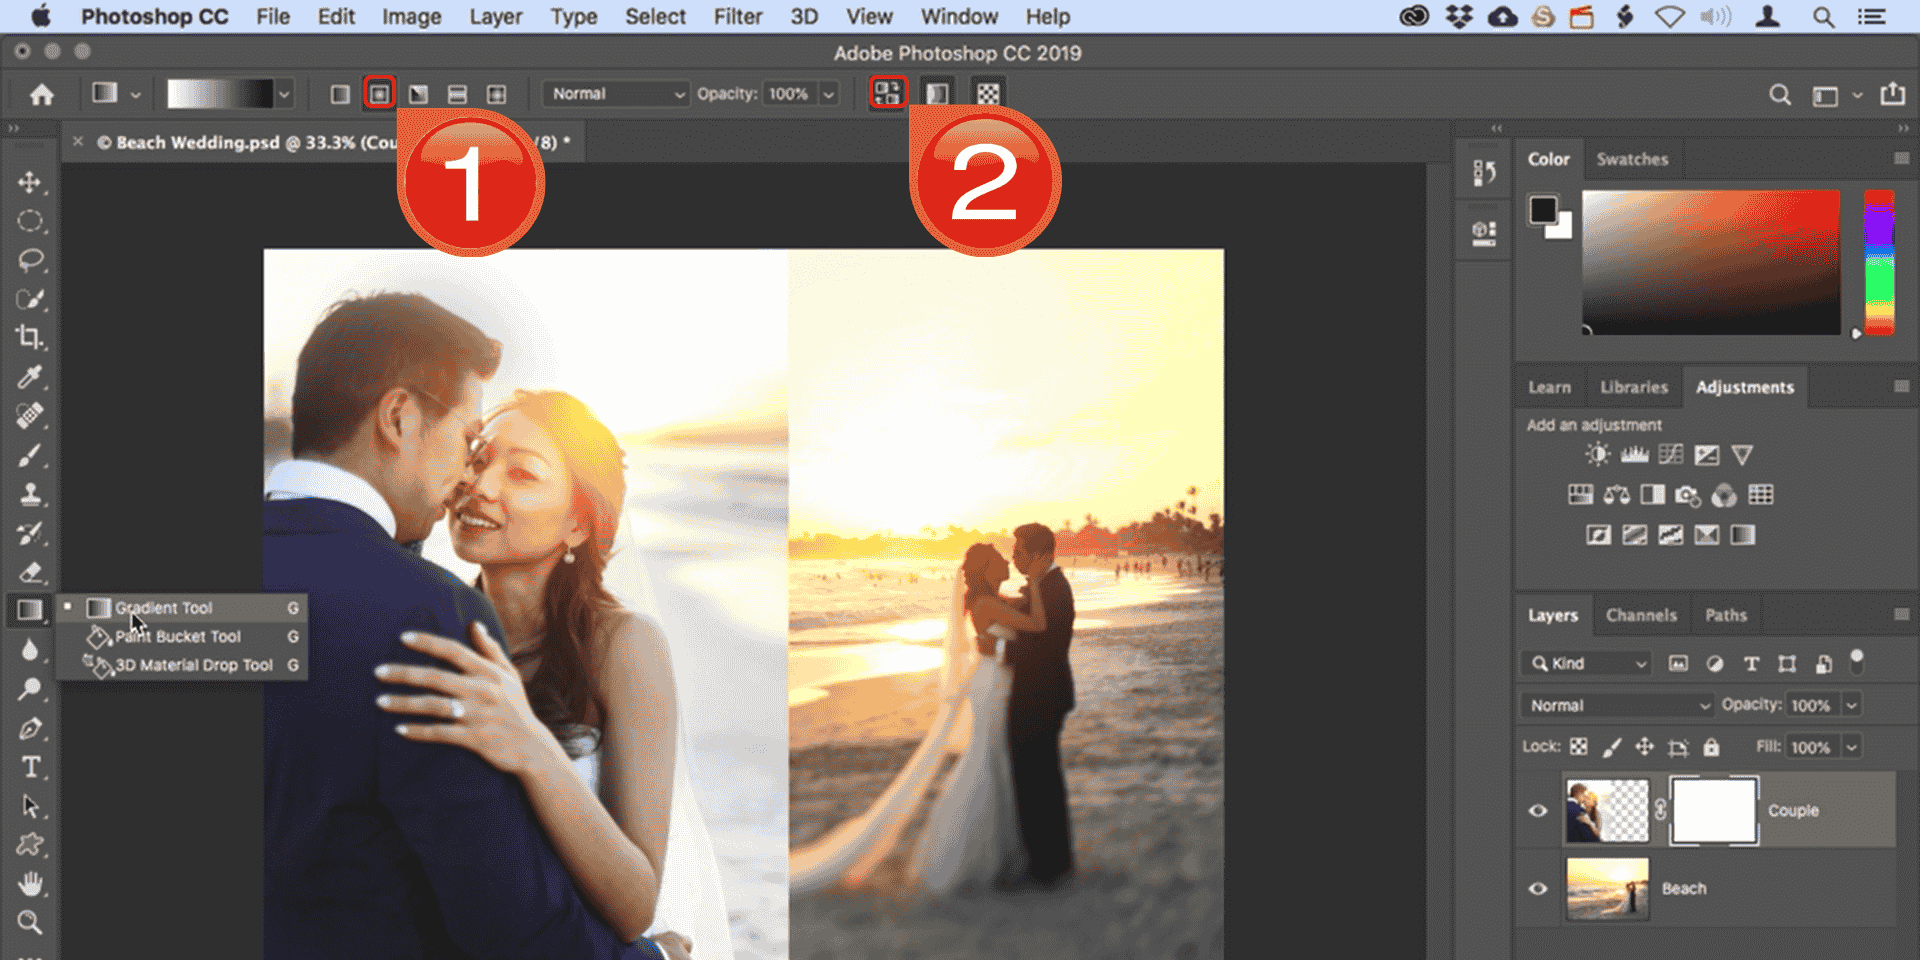
Step 2: Now, configure your tool settings up top. In the Options bar, choose the “Linear gradient” style and ensure that the “Reverse colors” checkbox is unchecked.
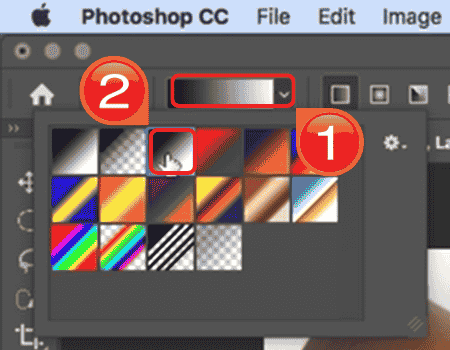
Step 3: Open the “Gradient Picker”in the Options bar and choose the “black-to-white gradient” (it's usually the third swatch).
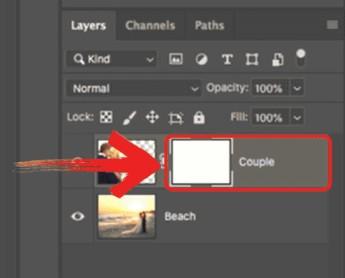
Step 4: Select the layer mask thumbnail in the Layers panel; you'll know it's active when you see a white highlight border around it.
Pros:
Creates smooth, professional transitions instantly.
Great for landscapes, sky replacements, and horizon blending.
Cons:
Less precise for detailed, intricate blending around small objects.
Clipping Masks and Opacity
Clipping Masks are an incredibly powerful technique for design-focused projects. This method forces the top layer to "snap" directly into the shape of the layer below it. It's ideal for overlaying textures onto text or filling specific shapes with an image, giving you a clean, professional look without needing to erase any edges manually.
Steps:
Before applying a Clipping Mask, you’ll want to position your images correctly. The layer order determines how the effect behaves, so this quick setup step is essential. Once aligned, creating the mask is just one click, and from there, you can shape the final look using opacity and blend modes.
Step 1: Place the image you want to be the frame on the bottom layer. The image you want to be clipped should be directly above it.
Step 2: On the top ribbon, select“Layer” and select “Create Clipping Mask”. The layer will snap into the shape of the layer below.

Step 3: Adjust the opacity or change the blend mode of the top layer to achieve the final blending effect.

Pros:
Ideal for overlaying textures or patterns and restricting effects to specific shapes.
You can move, resize, or swap the image inside the clipping mask freely.
Cons:
May require additional adjustments to make the edges soft or invisible.
Comparison Table of Blending Methods
Once you understand the core blending methods, it helps to comparethem side by side. This table breaks down each technique by ease of use, precision, best use cases, learning curve, and flexibility. It’s a quick reference to help decide which method fits your project and skill level, so you can work efficiently without trial and error.
| Method | Ease of Use | Precision | Best Use Cases | Learning Curve | Flexibility |
|---|---|---|---|---|---|
| Layer Masks | Moderate | High | Detailed composites, portraits | Medium | High |
| Blend Modes | Easy | Low-Medium | Creative effects, quick overlays | Low | Medium |
| Gradient Tool | Easy | Medium | Landscapes, smooth transitions | Low | Medium |
| Clipping Masks | Moderate | Medium-High | Textures, patterns, design work | Medium | High |
Each blending method has its own strengths, so the best choice depends on your project and the level of control you want. If precision and flexibility are top priorities, Layer Masks are worth investing time to master. For quick creative effects or experimenting with different moods, Blend Modes can save a lot of time. The Gradient Tool is perfect for smooth, natural transitions, especially in landscapes, while Clipping Masks are ideal when working with textures, patterns, or specific shapes. Understanding these differences helps you approach each project with confidence and efficiency.
Enhance Blended Images with Image Enhancer
After you blend two images in Photoshop, you might notice that even carefully blended images can benefit from an extra layer of polish. Subtle edges, slight color mismatches, or minor clarityissues can sometimes make a composite look less attractive than you had in mind. This is where Toolsmart Image Enhancer comes in, it’s designed to take your blended images and refine them automatically, smoothing transitions, enhancing colors, and improving overall sharpness.

Toolsmart Image Enhancer is a free, AI-powered tool that works across any device without downloads or watermarks. With a single click, it can instantly improve clarity, adjust tones, and sharpen details in your photos. Its mobile-friendly interface makes it easy to process images on the go, and batch processing allows you to enhance multiple photos at once. By using this tool after blending your images in Photoshop, you can save time while achieving a cleaner, more professional-looking final result.
Features:
Brightness Adjustment: Easily brighten or darken images to improve clarity.
Contrast and Sharpening: Enhance details by adjusting contrast and sharpness.
Image Smoothing: Smooth out textures for a polished look.
One-Click Enhancements: Simple, quick fixes that don’t require complex editing skills.
Free to Use: No subscription required, making it accessible to everyone.
User-Friendly Interface: Easy-to-navigate platform for both beginners and professionals.
Fast Processing: Enhances images in seconds, saving time for busy users.
FAQs
Q1: Can I blend images in Photoshop without layer masks?
Yes, blend modes and opacity adjustments offer alternative methods, though they provide less control over specific areas.
Q2: Is Image Enhancer free to use?
Yes, it’s 100% free with no login or watermarks.
Q3: Which blending method is best for beginners?
Blend modes are the easiest for beginners because they are applied instantly, while layer masks provide the most detailed control but require more practice.
Q4: Can Image Enhancer fix poorly blended edges?
While it cannot replace manual masking, it can enhance details and smooth color transitions, making minor blending errors less noticeable.
My Final Thoughts
Photoshop gives you multiple ways on how to blend two images in photoshop, whether you prefer precision with layer masks, speed with blend modes, smooth fades with gradients, or texture-based blends using clipping masks. Once you’ve created your composite, tools like Toolsmart Image Enhancer can give your work a polished, professional finish with just a click.

